Alesis RA500 User Manual - Page 27
Ystem, Etup And, Esting
 |
View all Alesis RA500 manuals
Add to My Manuals
Save this manual to your list of manuals |
Page 27 highlights
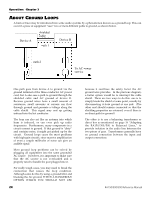
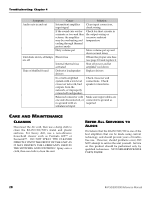
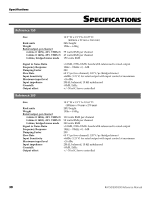
SYSTEM SETUP AND TESTING Before applying power for the first time, double check the wiring to insure that everything is firmly connected and that the proper signals are being fed to the proper places. If a low frequency signal in a multi-amplified system is applied to a high frequency transducer, the transducer can be damaged, and a loose connection can cause noise which can damage any transducer. Be certain that the amplifier front panel gain controls are set to minimum when the system under test is first powered up. After the power is applied, slowly advance each gain control to confirm that there are no driver-destroying hums or buzzes present-if there are, turn the power off and locate the source of the difficulty. When first applying program material to the system, it is also advisable to keep the gain controls turned down to confirm, once again, that the wiring is correct. Once the system wiring is determined to be correct, the gain controls can then be set to an appropriate level for the system gain structure. Chapter 3: Operation SETTING THE GAIN PROPERLY Setting the system gain is fairly straightforward, but if it is not properly adjusted, the system's distortion and noise characteristics may be less than optimum. The most common cause of noisy operation, especially in studio use, is that the amplifier's gain controls are left all the way up, while the mixer's output is turned down. This can lead to blown speakers if the mixer is accidentally turned up, but more importantly, it amplifies the noise floor of the mixer output stage or wiring unnecessarily. Keeping the source level as high as possible and lowering the amplifier input gain will keep the noise level at a minimum. The input sensitivity of the RA150/300/500 amplifiers at the 1/4" input or XLR input is 1.23 volts (+4 dBu) for rated output with the amplifier gain controls at maximum. If you're plugged into the phono jacks, the sensitivity is -10 dBV (.316 volts). If the signal at the amplifier input is higher than this, the input gain controls of the RA150/300/500 must be turned down to avoid amplifier clipping. Most mixers output +4 dBu at nominal level/0 VU; that means if you go "into the yellow" on the meter of most mixers, the amp will be clipping its outputs or distorting the speakers unless you turn down the input gain controls. It is generally best to try to keep the gain of the source device set for best signal-to-noise ratio consistent with distortion, and to then set the amplifier inputs for the desired SPL level. A good way to set levels is to use a test tone or pink noise with a sound level meter. Set the mixer's controls at nominal levels, increase the test tone until the mixer is exercising its dynamic range without clipping itself. The mixer's meter should read from +10 to +15. Then slowly raise the RA150/300/500's input level controls until the desired peak sound pressure level is achieved. RA150/300/500 Reference Manual 25
-
 1
1 -
2
-
3
-
4
-
5
-
6
-
7
-
8
-
9
-
10
-
11
-
12
-
13
-
14
-
15
-
16
-
17
-
18
-
19
-
20
-
21
-
 22
22 -
 23
23 -
 24
24 -
 25
25 -
 26
26 -
 27
27 -
 28
28 -
 29
29 -
 30
30 -
 31
31 -
 32
32 -
33
-
34
-
35
-
36
-
37
-
38
 |
 |