Alesis Strike Drum Module Strike Editor Software V1.1 - User Guide - Page 13
To select a hi-hat pedal function, To add a velocity range - strike pro drum module
 |
View all Alesis Strike Drum Module manuals
Add to My Manuals
Save this manual to your list of manuals |
Page 13 highlights
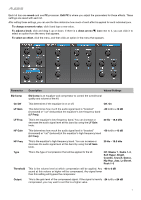
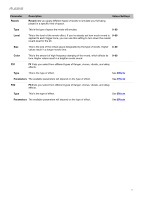
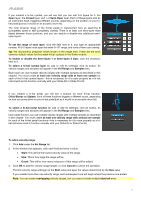
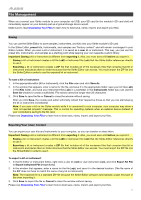
If you created a hi-hat cymbal, you will see that you can edit 3-5 layers for it: the Open layer, the Closed layer, and 1-3 Semi-Open layer. Each of these layers acts as an instrument itself, triggering different sounds, depending on the position of your hihat pedal (just as it would on an acoustic drum kit). The total physical range of the hi-hat pedal is represented here as spanning 0 (completely open) to 127 (completely closed). There is at least one semi-open state (layer) between those positions, and you can enable or disable two additional semiopen layers. To set the range of each layer, click the field next to it, and type an appropriate number. All 3-5 layers must span the entire 0-127 range, and none of them can overlap. Tip: We recommend using the values shown in the image here. These are the most common default values for the preset hi-hat cymbals in the Strike module. To enable or disable the Semi-Open 1 or Semi-Open 2 layer, click the checkbox next to it. To select a hi-hat cymbal layer (to add or edit its settings), click its button. Its velocity ranges and samples will appear in the Vel Range and Samples lists. Each layer can use multiple velocity ranges with multiple samples as described in this chapter. You must create at least one velocity range with at least one sample for each of the hi-hat cymbal layers-this is necessary for it to save properly as a hi-hat instrument and to function normally with your Strike Kit or Strike Pro Kit. If you created a hi-hat pedal, you will see a buttons for each hi-hat function: Chick/Stomp and Splash. Each of these functions triggers a different sound, depending on how you press down on your hi-hat pedal (just as it would on an acoustic drum kit). To select a hi-hat pedal function (to add or edit its settings), click its button. Its velocity ranges and samples will appear in the Vel Range and Samples lists. Each pedal function can use multiple velocity ranges with multiple samples as described in this chapter. You must create at least one velocity range with at least one sample for each of the hi-hat pedal functions-this is necessary for it to save properly as a hihat instrument and to function normally with your Strike Kit or Strike Pro Kit. To add a velocity range: 1. Click Add under the Vel Range list. 2. In the window that appears, click each field and enter a value: • Start: This will be the lowest velocity value of the range. • Size: This is how large the range will be. • Count: This will be how many instances of that range will be added. 3. Click OK to add the velocity range/ranges, or click Cancel to cancel the operation. The first velocity range will begin at the Start value and span the values determined by the Size value. If you created more than one velocity range, each subsequent one will begin where the previous one ended. Note: You can create overlapping velocity ranges, but you cannot create multiple identical ones. 13
-
 1
1 -
2
-
3
-
4
-
5
-
6
-
7
-
 8
8 -
 9
9 -
 10
10 -
 11
11 -
 12
12 -
 13
13 -
 14
14 -
 15
15 -
 16
16 -
 17
17 -
 18
18 -
19
-
20
-
21
-
22
-
23
 |
 |
