Alesis Strike Drum Module Strike Editor Software V1.1 - User Guide - Page 14
Sample Browser
 |
View all Alesis Strike Drum Module manuals
Add to My Manuals
Save this manual to your list of manuals |
Page 14 highlights
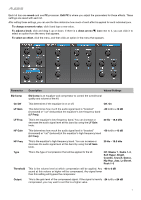
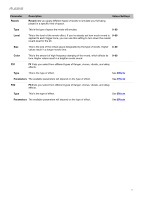
To edit a velocity range: 1. Double-click or right-click a velocity range in the Vel Range list, and select Edit. 2. In the window that appears, click each field and enter a value: • Start: This will be the lowest velocity value of the range. • End: This will be the highest velocity value of the range. 3. Click OK to confirm your edits, or click Cancel to cancel the operation. Note: You can create overlapping velocity ranges, but you cannot create multiple identical ones. To delete a velocity range, do either of the following: • Right-click a velocity range in the Vel Range list, and select Delete. • Click a velocity range in the Vel Range list, and press Delete on your keyboard. To add a sample to a velocity range: 1. Click the velocity range in the Vel Range list to select it. 2. Click and drag a sample from the Sample Browser onto the Samples list. Repeat this step to add more samples to the same velocity range. To add multiple adjacent samples at once, click the first sample in the Sample Browser, hold Shift on your keyboard, and then click and drag the last sample onto the Samples list. To add multiple non-adjacent samples at once, hold Ctrl on your keyboard, and click each sample in the Sample Browser. While still holding Ctrl, click and drag the last sample onto the Samples list. To play a sample, click the icon next to the sample in the Sample Browser. During playback, click the icon to stop it. To enable or disable automatic playback of samples, click Auto-Preview under the Samples list. When enabled, clicking a sample in the Samples list will play it. This is useful for quickly auditioning multiple samples assigned to the same velocity range (to ensure they're an appropriate sound and volume for that velocity). Tip: Use and on your keyboard to move through the list rather than clicking each one individually. To set the order in which multiple samples will be triggered with each hit, click the Cycle Mode selector to switch between Round Robin and Random: Round Robin: Each strike will trigger the next assigned sample in the list, from top to bottom. Random: Each strike will trigger a random assigned sample in the list. To reorder the samples in the Samples list, click and drag a sample in the list to the desired location, and release it. To move a sample to another velocity range, click and drag it over the desired range in the Vel Range column and release it. 14
-
 1
1 -
2
-
3
-
4
-
5
-
6
-
7
-
8
-
 9
9 -
 10
10 -
 11
11 -
 12
12 -
 13
13 -
 14
14 -
 15
15 -
 16
16 -
 17
17 -
 18
18 -
 19
19 -
20
-
21
-
22
-
23
 |
 |
