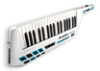
Alesis Vortex Quick Start Guide - Page 5
Editing The Slider, Accelerometer, Ribbon Controller, And Knobs, Editing Program Change Messages - midi
 |
View all Alesis Vortex manuals
Add to My Manuals
Save this manual to your list of manuals |
Page 5 highlights
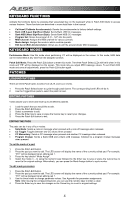
To change the MIDI channel of a pad: 1. Press the Patch Edit button. 2. Press the pad you want to edit. The LED screen will display the name of the currently edited pad. For example, "Pd1" will be displayed when editing pad 1. 3. Press the key labeled "MIDI Channel". The current MIDI channel of the pad you are editing will display on the LED Screen. 4. Use the numeric keys to enter a MIDI channel (1 - 16). 5. Press the Enter key to save the changes or the Cancel key to revert to the original setting. EDITING THE SLIDER, ACCELEROMETER, RIBBON CONTROLLER, AND KNOBS These controls can be in any of three modes: • CC: Sends control change messages. • Pitch Bend: Sends pitch bend messages. • Aftertouch: Sends channel aftertouch messages. To set the mode of a control: 1. Press the Patch Edit button. 2. Move the control you want to edit. The LED screen will display the name of the currently edited control. a. For the accelerometer, press the Edit Accel key on the keyboard. b. For the ribbon controllers, press one of the three buttons that you want to edit. Note: You can set each of the three ribbon control buttons to different modes within the same patch. 3. Press the key labeled "Mode Assign". 4. Select the mode (1 - 3) using the numeric keys followed by the Enter key to save or press the Cancel key to revert to the original settings. Alternatively, you can press the Mode Assign button to cycle modes. To edit mode parameters: 1. Press the Patch Edit button. 2. Move the control you want to edit. The LED screen will display the name of the currently edited control. a. For the accelerometer, press the Edit Accel key on the keyboard. b. For the ribbon controllers, press one of the three buttons that you want to edit. 3. Use the 3 knobs to change parameter values. See Appendix for parameter assignments. Note: After moving the corresponding knob, you can use the numeric keys to enter a value. 4. Press the Enter key to save the changes or the Cancel key to revert to original settings. To change the MIDI channel of a control: 1. Press the Patch Edit button. 2. Move the control you want to edit. The LED screen will display the name of the currently edited control. a. For the accelerometer, press the Edit Accel key on the keyboard. b. For the ribbon controllers, press one of the three buttons that you want to edit. 3. Press the key labeled "MIDI Channel". The current MIDI channel of the pad you are editing will display on the LED Screen. 4. Use the numeric keys to enter a MIDI channel (1 - 16). 5. Press the Enter key to save the changes or the Cancel key to revert to the original setting. To reverse the direction of a control: Follow the steps below to reverse the direction of a control, e.g., the ribbon controller in Ribbon Mode 1, so that the maximum value is located at the left of the ribbon and the minimum value is located on the right side of the ribbon: 1. Press "Patch Edit" (the Display screen will show "PE".). 2. Press the "Ribbon Mode 1" button (the Display screen will show "rb1".). 3. Turn the K2 knob to "127" and turn the K3 knob to "0". 4. Press the "Enter" key on Vortex's keyboard. 5. Press "Patch Edit" to return to Performance Mode (the Display screen will show "PF".). The ribbon controller will now be reversed in Ribbon Mode 1. EDITING PROGRAM CHANGE MESSAGES When a patch is loaded on Vortex, a program change message will be sent through the USB port and 5-pin MIDI OUT port. This section describes what message will be sent when a patch is selected. Setting Program Number: 1. Press the Patch Edit button. 2. Press the Program Set key. 3. To enter the Program number for the patch, use the numeric keys to enter a value (0 - 127). 4. Press the Enter key to save the changes or the Cancel key to revert to the original setting. 5
-
 1
1 -
 2
2 -
 3
3 -
 4
4 -
 5
5 -
 6
6 -
 7
7 -
 8
8 -
 9
9 -
 10
10 -
 11
11 -
12
-
13
-
14
-
15
-
16
-
17
-
18
-
19
-
20
-
21
-
22
-
23
-
24
-
25
-
26
-
27
-
28
-
29
-
30
-
31
-
32
-
33
-
34
-
35
-
36
-
37
-
38
-
39
-
40
 |
 |
