Alpine IDA-X303 Ida-x303 Owner's Manual (english) - Page 9
Alpine IDA-X303 - Radio / Digital Player Manual
 |
UPC - 793276711601
View all Alpine IDA-X303 manuals
Add to My Manuals
Save this manual to your list of manuals |
Page 9 highlights
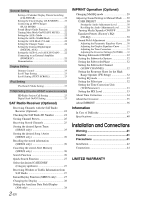
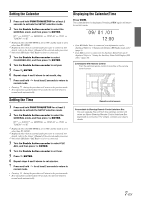
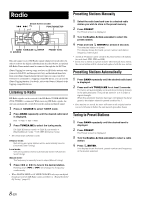
Setting the Calendar 1 Press and hold FUNCTION/SETUP for at least 2 seconds to activate the SETUP selection mode. 2 Turn the Double Action encoder to select the GENERAL mode, and then press /ENTER. BT*1 AUDIO*2 TUNER*3 BT GENERAL DISPLAY IPOD *1 Displayed only when INT MUTE is set to OFF, and the mode is set to other than BT AUDIO. *2 Displayed only when an external audio processor is connected. For details, refer to the Owner's Manual of the external audio processor. *3 Only when HD Radio / SAT Radio receiver is connected. 3 Turn the Double Action encoder to select CALENDAR ADJ, and then press /ENTER. 4 Turn the Double Action encoder to set year. 5 Press /ENTER. 6 Repeat steps 4 and 5 above to set month, day. 7 Press and hold for at least 2 seconds to return to normal mode. • Pressing during the procedure will return to the previous mode. • If no operation is performed for 60 seconds, the unit will return to normal mode automatically. Displaying the Calendar/Time Press VIEW. The calendar/time is displayed. Pressing VIEW again will return to normal mode. 09/ 01 /01 12:00 • If an HD Radio Tuner is connected, text information can be displayed. Refer to "Changing the Display (HD Radio mode only)" (page 9). • If an XM receiver is connected, the Auxiliary Data Field can be displayed. Refer to "Setting the Auxiliary Data Field Display (XM only)" (page 28). Controllable With Remote Control Point the optional remote control transmitter at the remote control sensor. Setting the Time 1 Press and hold FUNCTION/SETUP for at least 2 seconds to activate the SETUP selection mode. 2 Turn the Double Action encoder to select the GENERAL mode, and then press /ENTER. BT*1 AUDIO*2 TUNER*3 BT GENERAL DISPLAY IPOD *1 Displayed only when INT MUTE is set to OFF, and the mode is set to other than BT AUDIO. *2 Displayed only when an external audio processor is connected. For details, refer to the Owner's Manual of the external audio processor. *3 Only when HD Radio / SAT Radio receiver is connected. 3 Turn the Double Action encoder to select CLK ADJ, and then press /ENTER. 4 Turn the Double Action encoder to set hour. 5 Press /ENTER. 6 Repeat steps 4 and 5 above to set minutes. 7 Press and hold for at least 2 seconds to return to normal mode. • Pressing during the procedure will return to the previous mode. • If no operation is performed for 60 seconds, the unit will return to normal mode automatically. Remote control sensor Connectable to Steering Remote Control Interface Box You can operate this unit from the vehicle's control unit when an Alpine Steering Remote Control Interface Box (optional) is connected. For details, contact your Alpine dealer. 7-EN
-
 1
1 -
2
-
3
-
 4
4 -
 5
5 -
 6
6 -
 7
7 -
 8
8 -
 9
9 -
 10
10 -
 11
11 -
 12
12 -
 13
13 -
 14
14 -
15
-
16
-
17
-
18
-
19
-
20
-
21
-
22
-
23
-
24
-
25
-
26
-
27
-
28
-
29
-
30
-
31
-
32
-
33
-
34
-
35
-
36
-
37
-
38
-
39
-
40
-
41
-
42
-
43
-
44
-
45
-
46
-
47
-
48
 |
 |