Alpine M300 Om Nve-m300 En - Page 10
Map Functions - manual
 |
UPC - 793276100207
View all Alpine M300 manuals
Add to My Manuals
Save this manual to your list of manuals |
Page 10 highlights
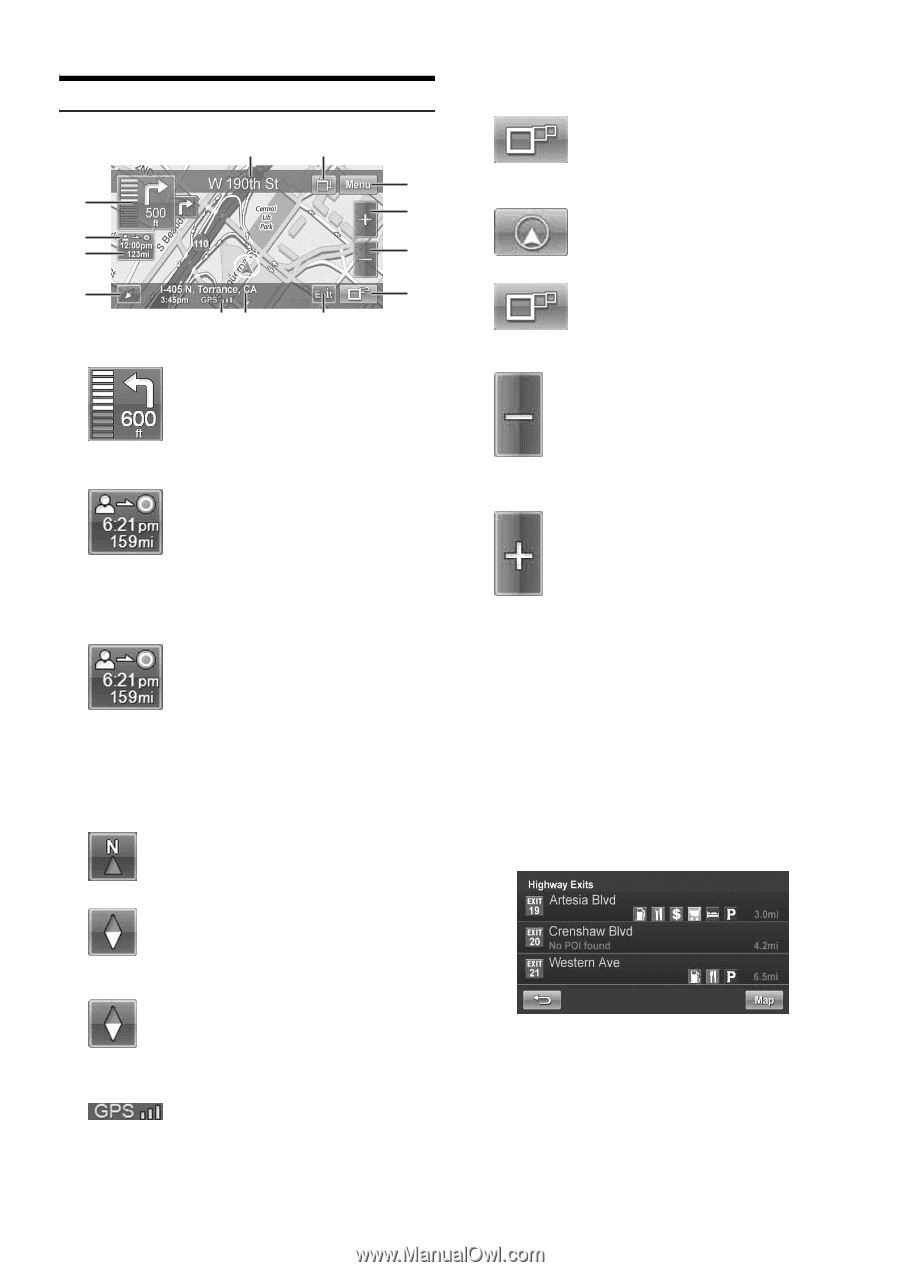
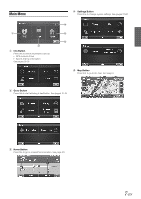
Map Functions ! @ 0 1 9 2 3 8 4 7 56 # 1 Next Maneuver Arrow and Voice Prompt Button Repeating the Announcement Touch this icon to repeat the guide announcement. (Same as Next Maneuver Arrow) 6 Current Position 7 Change Route View to Arrow Only Mode Switching Map Display Touch this button to switch between Map and Arrow modes. • You can only switch map display during guidance mode. Arrow Mode Displays three successive arrow maneuvers all the way to your destination while providing turn-by-turn guidance prompts. Map Mode Shows a full-screen map of the area while providing turn-by-turn guidance prompts. 8 Zoom Out Button Touch this icon to zoom out. 2 Route Button Touch this icon and it will take you to the route menu. 9 Zoom In Button Touch this icon to zoom in. • When not in the guidance mode, only the current position can be seen. Zoom buttons, Map Orientation button and Main Menu are available. 3 Estimate Time Display This icon displays Estimated Time Remaining, Estimated Time of Arrival or Direction to Destination. See page 23 to change this setting. • The time estimates are based on the average speed. The estimate time will vary depending on vehicle speed. The arrow always points toward the destination. 4 Map Orientation Touch this icon to switch between North Up, Heading Up and 3D View. North Up In north up view, north is always at the top of the display. This makes it easy to determine your current heading with respect to the map. Heading Up In heading-up view, the current direction is always pointing to the top of the display. This makes it easy to see the direction of the next turn on the map. 3D View The 3D View offers you a more realistic perspective by tilting the map and displaying it with a horizon line. Streets are displayed as you approach them instead of from a birds-eye view. 5 GPS Status Bar GPS Signal Strength 0 Main Menu Button ! Next Street Name @ Touch panel-compatible monitor Access Button Operation buttons on the connected Touch panelcompatible monitor or AV Head Unit are displayed. For details, refer to the Owner's manual of the Touch panelcompatible monitor or AV Head Unit. # Highway Exit Button When the vehicle is on a Highway, the screen is displayed. Highway exit information is displayed as a list in order of close proximity to current position. You can also set a waypoint, etc., by touching the desired Highway Exit. 8-EN
-
 1
1 -
2
-
3
-
4
-
 5
5 -
 6
6 -
 7
7 -
 8
8 -
 9
9 -
 10
10 -
 11
11 -
 12
12 -
 13
13 -
 14
14 -
 15
15 -
16
-
17
-
18
-
19
-
20
-
21
-
22
-
23
-
24
-
25
-
26
-
27
-
28
-
29
-
30
 |
 |