Alpine VPX-B104R Owners Manual - Page 17
Fish-eye, Correction
 |
View all Alpine VPX-B104R manuals
Add to My Manuals
Save this manual to your list of manuals |
Page 17 highlights
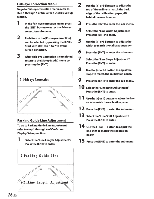
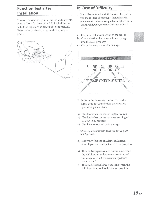
Fish-eye Correction Menu To go to Fish-eye correction menu, refer to step 1 through 4 of On-Screen Display Set-up section. 1 In the fish-eye correction menu, press the [ENT] button to enter the fish-eye correction sub-menu. 2 Each item in the [fish-eye correction] can be selected by pressing the [ENT]. Start with OFF, FEC 1 to 7 to avoid screen distortion. 3 After Fish-eye Correction is completed, returrn to the [Setup Mode] menu by pressing the [ENT.] - - -- - - · ·- - 1. Fish-eye Correction Parking Guide Line Adjustment To go to Parking Guide Line Adjustment, refer to step 1 through 4 of On-Screen Display Set-up section. 1 Select the "Line Length Adjustment'~ Press the [ENT] to enter. 2 Use the [+1or [-1button to adjust the top of Green line to match the back edge of the calibration paper, 6ft behind the rear bumper. 3 Press the [ENT] to enter the sub-menu. 4 Select the "Line Width Adjustment'~ Press the [ENT] to enter. 5 Use the [+1or [-1button to adjust the width to match the calibration paper. 6 Press the [ENT] to enter the sub-menu. 7 Select the "Line Slope Adjustment'~ Press the [ENT] to enter. 8 Use the [+] or [-] button to adjust the slope to match the calibration paper. 9 Press the [ENT] to enter the sub-menu. 1 0 Select the "Line Ratio Adjustment'~ Press the [ENT] to enter. 11 Use the [+] or [-] button to adjust the line ratio to match the calibration paper. 12 Press the [ENT] to enter the sub-menu. 13 Select the "Line Shift Adjustment'~ Press the [ENT] to enter. 1 4 Use the [+] or [-] button to adjust the line shift to match the calibration paper. 15 Press the [ENT] to enter the sub-menu. 2.Parking Guide Line 16-EN ine Length Adjust nt
-
 1
1 -
2
-
3
-
4
-
5
-
6
-
7
-
8
-
9
-
10
-
11
-
 12
12 -
 13
13 -
 14
14 -
 15
15 -
 16
16 -
 17
17 -
 18
18 -
 19
19 -
 20
20 -
 21
21 -
 22
22 -
23
-
24
-
25
-
26
-
27
-
28
 |
 |