Ariens Compact 24 Owners Manual - Page 24
DISCHARGE CHUTE, SPEED SELECTOR, ADJUSTMENT, Remote Deflector Control Cable - how to start
 |
View all Ariens Compact 24 manuals
Add to My Manuals
Save this manual to your list of manuals |
Page 24 highlights
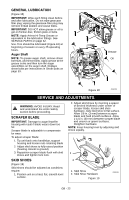
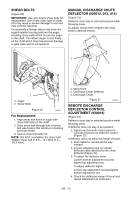
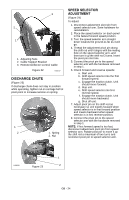
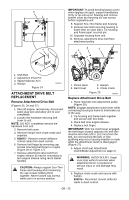
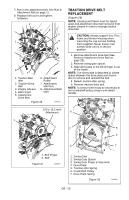
3 2 1 1. Adjusting Nuts 2. Cable Support Bracket 3. Remote Deflector Control Cable Figure 22 OS8217 DISCHARGE CHUTE (Figure 23) If discharge chute does not stay in position while operating, tighten nut on carriage bolt at pivot point to increase tension on spring. 1 2 1. Spring 2. Nut SPEED SELECTOR ADJUSTMENT (Figure 24) To adjust: 1. Disconnect adjustment pivot pin from speed selector arm. Save hardware for reinstallation. 2. Place the speed selector on dash panel in the fastest forward speed position. 3. Turn the speed selector arm straight down towards the ground as far as it will go. 4. Thread the adjustment pivot pin along the shift rod until it aligns with the mating hole on the speed selector arm, and then turn it up the shift rod 3 turns. Insert the pivot pin into hole. 5. Connect the pivot pin to the speed selector arm with the hardware removed in step 1. 6. Check forward and reverse speeds: a. Start unit. b. Shift speed selector into the first forward speed. c. Engage the traction clutch. Unit should move forward. d. Stop unit. e. Shift speed selector into first reverse speed. f. Engage the traction clutch. Unit should move backward. g. Shut off unit. 7. Adjust pivot pin on the shift rod as necessary so unit travels forward when speed selector is in first forward position and travels backward when speed selector is in first reverse position. 8. Connect the pivot pin to the speed selector arm with the hardware removed in step 1. NOTE: If first forward speed is too fast, disconnect adjustment pivot pin from speed selector arm. Rotate pivot pin to move it up the shift rod a maximum of two turns and reconnect pivot pin to speed selector arm. 1 OS8220 Figure 23 2 GB - 24
-
 1
1 -
2
-
3
-
4
-
5
-
6
-
7
-
8
-
9
-
10
-
11
-
12
-
13
-
14
-
15
-
16
-
17
-
18
-
 19
19 -
 20
20 -
 21
21 -
 22
22 -
 23
23 -
 24
24 -
 25
25 -
 26
26 -
 27
27 -
 28
28 -
 29
29 -
30
-
31
-
32
-
33
-
34
-
35
-
36
-
37
-
38
 |
 |
