Ariens Compact 24 Owners Manual - Page 28
Check Attachment Idler Arm Roller, Clearance, Adjust the Attachment Clutch Cable, Spring Extension
 |
View all Ariens Compact 24 manuals
Add to My Manuals
Save this manual to your list of manuals |
Page 28 highlights
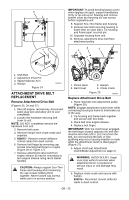
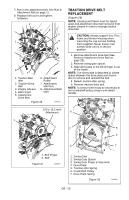
With the attachment clutch disengaged, 1 2 check the attachment idler arm position here. The attachment idler arm should lightly touch the frame. Figure 30 OS8240 Check Attachment Idler Arm Roller Clearance 1. Place the unit into the service position. Remove the bottom cover. 2. With the attachment clutch lever engaged, check the clearance between the frame and plastic roller on the lower end of the attachment idler arm (Figure 31). Roller should be 1/2 - 7/8 in. (12.7 - 22.2 mm) from the frame when the attachment clutch is engaged. 1. Idler Adjustment Nut 2. Attachment Belt Idler Figure 32 OS8285 Adjust the Attachment Clutch Cable Spring Extension 1. Check the attachment clutch cable spring extension. Measure the length of the attachment clutch cable spring with the clutch lever disengaged. Then measure the attachment clutch spring with the clutch lever engaged. See Figure 33. The spring should be 1/2 - 9/16 in. (12.7 - 14.3 mm) longer when the clutch lever is engaged. • If spring extension is within the specified range, go to Check Attachment Brake on page 29. • If spring extension is outside of specified range, go to step 2. Figure 31 OS8260 • If roller is 1/2 - 7/8 n. (12.7 - 22.2 mm) from frame, go to Adjust the Attachment Clutch Cable Spring Extension on page 28. • If roller is less than 1/2 in. (12.7 mm) from frame, loosen idler adjustment nut and move idler closer to the belt. Tighten adjustment nut and recheck the roller clearance (Figure 32). • If roller is more than 7/8 in. (22.2 mm) from frame, loosen idler adjustment nut and move idler away from the belt. Tighten adjustment nut and recheck roller clearance (Figure 32). GB - 28 1/2 - 9/16 in. (12.7 - 14.3 mm) Figure 33 OS8265
-
 1
1 -
2
-
3
-
4
-
5
-
6
-
7
-
8
-
9
-
10
-
11
-
12
-
13
-
14
-
15
-
16
-
17
-
18
-
19
-
20
-
21
-
22
-
 23
23 -
 24
24 -
 25
25 -
 26
26 -
 27
27 -
 28
28 -
 29
29 -
 30
30 -
 31
31 -
 32
32 -
 33
33 -
34
-
35
-
36
-
37
-
38
 |
 |
