Ariens Compact Track 24 Owners Manual - Page 25
Bottom Cover Removal
 |
View all Ariens Compact Track 24 manuals
Add to My Manuals
Save this manual to your list of manuals |
Page 25 highlights
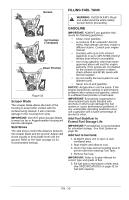
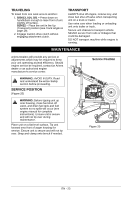
To ensure adequate lubricant level: 1. Remove oil fill plug and seal washer (Figure 21). Lubricant must be 1.63 - 1.88" (4.14 - 4.78 cm) from the flat surface of the gear case cover. IMPORTANT: DO NOT remove the gear case cover. 2. Check oil level with suitable dipstick device. Add lubricant if required. NOTICE: Inspect seal washer for wear or rubber deterioration and replace as needed. IMPORTANT: Use only Ariens L3 synthetic severe duty gear lube (Part Number 00068800). Use of other lubricants will void unit warranty. 3. Reinstall oil fill plug and seal washer to 80 lbf - in. (9 N•m). IMPORTANT: DO NOT OVER-TORQUE! Note that measurements are in pound force inches (lbf - in) and NOT pound force foot (lbf - ft). IMPORTANT: Be sure to install seal washer with rubber side down (Figure 21). IMPORTANT: Improper torquing, omission of seal washer, or incorrect installation of seal washer will void unit warranty. 2 3 BOTTOM COVER REMOVAL (920013, 014, 021) 1. Remove the six screws that attach the bottom cover (4) to the frame and remove the bottom cover. 2. Reinstall cover to the frame using six screws. (920022) (Figure 22) 1. Place the unit into the service position. 2. Remove the three top-lock flange nuts (1) that hold the height adjuster plate (2) to the height adjuster bracket. 3. Remove the height adjuster plate (2) and the three spacers on the carriage bolts. The height adjuster stop (3) should now only be attached to the rear axle. 4. Slide the height adjuster stop to the right and rotate away from frame to make room for the removal of the bottom cover. NOTICE: Track carriage can rotate freely without the height adjuster stop attached to the height adjuster bracket. BE CAREFUL to keep fingers and hands out of pinch points. 5. Remove six screws that attach the bottom cover (4) to the frame and remove the bottom cover. 6. Rotate the track carriage as needed to remove bottom cover. 7. Reverse steps 6 - 1 to install the bottom cover. 1 2 1 1. Auger Gearcase 2. Oil Fill Plug 3. Seal Washer Figure 21 OS8195 1. Top-Lock Flange Nut 2. Height Adjuster Plate 3. Height Adjuster Stop 4. Bottom Cover 5. Rear Axle Figure 22 3 4 5 EN - 25
-
 1
1 -
2
-
3
-
4
-
5
-
6
-
7
-
8
-
9
-
10
-
11
-
12
-
13
-
14
-
15
-
16
-
17
-
18
-
19
-
 20
20 -
 21
21 -
 22
22 -
 23
23 -
 24
24 -
 25
25 -
 26
26 -
 27
27 -
 28
28 -
 29
29 -
 30
30 -
31
-
32
-
33
-
34
-
35
-
36
-
37
-
38
-
39
-
40
-
41
-
42
-
43
-
44
-
45
-
46
 |
 |
