Ariens Hydro Pro 32 Owners Manual - Page 20
Maintenance, Maintenance Schedule, Service Position, Check Dual Handle, Interlock, Check Fasteners
 |
View all Ariens Hydro Pro 32 manuals
Add to My Manuals
Save this manual to your list of manuals |
Page 20 highlights
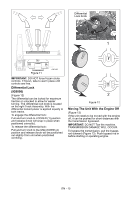
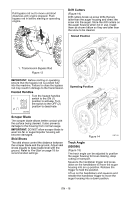
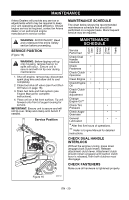
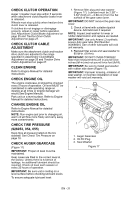
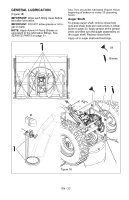
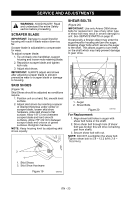
MAINTENANCE Ariens Dealers will provide any service or adjustments which may be required to keep your unit operating at peak efficiency. Should engine service be required, contact an Ariens dealer or an authorized engine manufacturer's service center. WARNING: AVOID INJURY. Read and understand the entire Safety section before proceeding. SERVICE POSITION (Figure 16) WARNING: Before tipping unit up onto housing, remove fuel so no spills will occur . Ensure unit is secure and will not tip over during maintenance. 1. Shut off engine, remove key, disconnect spark plug wire and allow unit to cool completely. 2. Close fuel shut-off valve (see Fuel ShutOff Valve on page 18). 3. Drain fuel tank and fuel system (see Engine Manual for complete instructions). 4. Place unit on a flat level surface. Tip unit forward onto front of auger housing for service. IMPORTANT: Ensure unit is secure and will not tip over. Strap and clamp onto bench if needed. Service Position MAINTENANCE SCHEDULE The chart below shows the recommended maintenance schedule that should be performed on a regular basis. More frequent service may be required. MAINTENANCE SCHEDULE Each Use Every 5 hrs. Ever y 25 hrs. Yearly Service Performed Check Dual • Handle Interlock Check • Fasteners Check Clutch • Operation Clean Engine • Check Engine • • Oil Check Clutch Cable Adjustment * • Change Engine Oil ** Check Tire • Pressure Check Auger Gearcase • • General Lubrication • • * After first five hours of operations. ** Refer to Engine Manual for detailed instructions. CHECK DUAL HANDLE INTERLOCK Without the engine running, press down (engage) both clutch levers. Release attachment clutch lever. Attachment clutch should remain engaged until traction clutch lever is released, then both clutches must disengage. CHECK FASTENERS Make sure all hardware is tightened properly. Figure 16 OS7121 EN - 20
-
 1
1 -
2
-
3
-
4
-
5
-
6
-
7
-
8
-
9
-
10
-
11
-
12
-
13
-
14
-
 15
15 -
 16
16 -
 17
17 -
 18
18 -
 19
19 -
 20
20 -
 21
21 -
 22
22 -
 23
23 -
 24
24 -
 25
25 -
26
-
27
-
28
-
29
-
30
-
31
-
32
-
33
-
34
-
35
-
36
-
37
-
38
 |
 |
