Ariens Hydro Pro 32 Owners Manual - Page 24
Handlebar Height, Remote Deflector Control, Important, Caution
 |
View all Ariens Hydro Pro 32 manuals
Add to My Manuals
Save this manual to your list of manuals |
Page 24 highlights
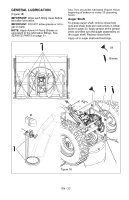
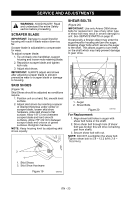
HANDLEBAR HEIGHT (Figure 21) CAUTION: AVOID INJURY. Adjust the attachment clutch, speed selector and traction clutch after changing the handlebar height. See Attachment Clutch/Brake Adjustment on page 25 and Speed Selector Adjustment on page 25. To raise or lower the handlebar: 1. Place unit in service position (see Service Position on page 20). 2. Remove bottom cover. 3. Remove top mounting bolts from the handlebars and adjust the handlebar up or down as needed until the handlebar mounting holes align with holes in unit frame. 4. Secure handlebar to frame with hardware removed in step 3 using the different hardware locations shown in Figure 21. 1 2 REMOTE DEFLECTOR CONTROL (Figure 22) Deflector must stay in selected position while throwing snow. If deflector does not stay in set position: 1. Tighten nut beneath control panel to increase pressure on deflector control. If deflector does not follow full range of travel: 1. Push deflector remote all the way forward. 2. Loosen adjusting nuts on cable support bracket underneath the dash panel (Figure 22). 3. To adjust the deflector lower: Slide cable down. Tighten bottom nut. 4. To adjust deflector higher: Slide cable up. Tighten top nut. 5. Check travel and repeat adjustment as necessary. 1 2 3 3 4 5 4 5 1. Upper Position 2. Lower Position 3. Handlebar 4. Upper Mounting Bolt 5. Lower Mounting Bolt Figure 21 OS7155 5. Check and adjust speed selector. See Speed Selector Adjustment on page 25. 6. Check tension on auger and traction clutch cables. IMPORTANT: Cables should not be slack nor under tension. Adjust as necessary. 7. Re-install bottom cover. 1 2 1. Adjusting Nuts 2. Cable Support Bracket Figure 22 EN - 24
-
 1
1 -
2
-
3
-
4
-
5
-
6
-
7
-
8
-
9
-
10
-
11
-
12
-
13
-
14
-
15
-
16
-
17
-
18
-
 19
19 -
 20
20 -
 21
21 -
 22
22 -
 23
23 -
 24
24 -
 25
25 -
 26
26 -
 27
27 -
 28
28 -
 29
29 -
30
-
31
-
32
-
33
-
34
-
35
-
36
-
37
-
38
 |
 |
