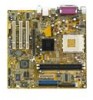
Asus A7V400-MX SE A7V400-MX SE user's manual for English version - Page 40
ASUS CrashFree BIOS utility, ASUS EZ Flash utility - windows 7
 |
View all Asus A7V400-MX SE manuals
Add to My Manuals
Save this manual to your list of manuals |
Page 40 highlights
2.1.3 ASUS CrashFree BIOS utility The ASUS CrashFree BIOS allows you to update the BIOS file when it fails or gets corrupted. You can update a corrupted BIOS file using a floppy disk that contains the updated BIOS file and the AWDFLASH utility. Before using this utility, prepare the bootable floppy disk containing the updated motherboard BIOS and the AWDFLASH.EXE utility. The AWDFLASH.EXE utility is available from the support CD. To update the BIOS using CrashFree BIOS: 1. Turn on the system. 2. When prompted, place the floppy disk with the updated BIOS file and the AWDFLASH.EXE utility to the floppy disk drive. 3. The AwardBIOS Flash Utility window appears. Follow the instructions in the previous section to update the BIOS. Before using the ASUS CrashFree BIOS feature on this motherboard, you must install an AGP or PCI VGA card to one of the expansion slots before you turn on the computer. Motherboards with onboard VGA (such as A7V400-MX SE) do not display the screen when the BIOS crashes even after you reboot the computer. 2.1.4 ASUS EZ Flash utility The ASUS EZ Flash feature allows you to update the BIOS without having to go through the long process of booting from a floppy disk and using a DOS-based utility. The EZ Flash utility is built-in the BIOS chip so it is accessible by pressing + during the Power-On Self Tests (POST). Before using this utility, prepare the floppy disk containing the updated motherboard BIOS. To update the BIOS using EZ Flash: 1. Insert the floppy disk with the updated BIOS file to the floppy disk drive, then turn on the system. 2. Press + during POST to display the AwardBIOS Flash Utility screen. 3. Follow the instructions in section "2.1.2 Award BIOS Flash Utility" to update the BIOS. After updating the BIOS file using the AwardBIOS Flash Utility, ASUS CrashFree BIOS, or ASUS EZ Flash, enter the BIOS Setup and load the default values using the Exit Menu. See section "2.7 Exit menu" for details. 2-4 Chapter 2: BIOS setup
-
 1
1 -
2
-
3
-
4
-
5
-
6
-
7
-
8
-
9
-
10
-
11
-
12
-
13
-
14
-
15
-
16
-
17
-
18
-
19
-
20
-
21
-
22
-
23
-
24
-
25
-
26
-
27
-
28
-
29
-
30
-
31
-
32
-
33
-
34
-
 35
35 -
 36
36 -
 37
37 -
 38
38 -
 39
39 -
 40
40 -
 41
41 -
 42
42 -
 43
43 -
 44
44 -
 45
45 -
46
-
47
-
48
-
49
-
50
-
51
-
52
-
53
-
54
-
55
-
56
-
57
-
58
-
59
-
60
-
61
-
62
-
63
-
64
-
65
-
66
-
67
-
68
-
69
-
70
-
71
-
72
 |
 |
