Asus A7V400-MX SE A7V400-MX SE user's manual for English version - Page 45
General help, Scroll bar, Sub-menu, Saving changes and exiting the Setup program - sata
 |
View all Asus A7V400-MX SE manuals
Add to My Manuals
Save this manual to your list of manuals |
Page 45 highlights
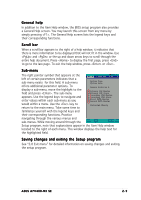
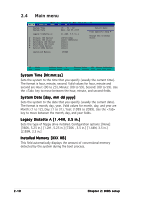
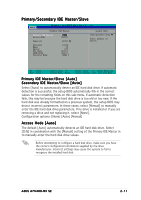
General help In addition to the Item Help window, the BIOS setup program also provides a General Help screen. You may launch this screen from any menu by simply pressing . The General Help screen lists the legend keys and their corresponding functions. Scroll bar When a scroll bar appears to the right of a help window, it indicates that there is more information to be displayed that will not fit in the window. Use and or the up and down arrow keys to scroll through the entire help document. Press to display the first page, press to go to the last page. To exit the help window, press or . Sub-menu The right pointer symbol that appears at the left of certain parameters indicates that a sub-menu exists for this field. A sub-menu System Time System Date offers additional parameter options. To display a sub-menu, move the highlight to the field and press . The sub-menu appears. Use the legend keys to navigate and enter values within each sub-menu as you Legacy Diskette A: Primary IDE Master Primary IDE Slave Secondary IDE Master Secondary IDE Slave First SATA Master Second SATA Master would within a menu. Use the key to return to the main menu. Take some time to Installed Memory familiarize yourself with the legend keys and their corresponding functions. Practice navigating through the various menus and sub-menus. While moving around through the F1 : Help ↑↓ : Select Ite ESC : Exit →← : Select Men Setup program, note that explanations appear in the Item Help window located to the right of each menu. This window displays the help text for the highlighted field. Saving changes and exiting the Setup program See "2.8 Exit menu" for detailed information on saving changes and exiting the setup program. ASUS A7V400-MX SE 2-9
-
 1
1 -
2
-
3
-
4
-
5
-
6
-
7
-
8
-
9
-
10
-
11
-
12
-
13
-
14
-
15
-
16
-
17
-
18
-
19
-
20
-
21
-
22
-
23
-
24
-
25
-
26
-
27
-
28
-
29
-
30
-
31
-
32
-
33
-
34
-
35
-
36
-
37
-
38
-
39
-
 40
40 -
 41
41 -
 42
42 -
 43
43 -
 44
44 -
 45
45 -
 46
46 -
 47
47 -
 48
48 -
 49
49 -
 50
50 -
51
-
52
-
53
-
54
-
55
-
56
-
57
-
58
-
59
-
60
-
61
-
62
-
63
-
64
-
65
-
66
-
67
-
68
-
69
-
70
-
71
-
72
 |
 |
