Asus ET1612I User's Manual for English Edition - Page 23
English, Secure the four wall mount
 |
View all Asus ET1612I manuals
Add to My Manuals
Save this manual to your list of manuals |
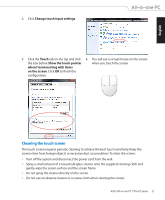
Page 23 highlights
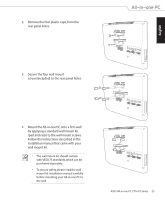
2. Remove the four plastic caps, from the rear panel holes. 3. Secure the four wall mount screws(included) to the rear panel holes. 4. Mount the All-in-one PC onto a firm wall by applying a standard wall mount kit (pad and rack) to the wall mount screws. Follow the instructions described in the installation manual that came with your wall mount kit. • The wall mount kit should comply with VESA 75 standards, which can be purchased separately. • To ensure safety, please read the wall mount kit installation manual carefully before mounting your All-in-one PC to the wall. -2 -1 -2 -1 -2 -1 ASUS All-in-one PC ET1612I Series 23 English
-
 1
1 -
2
-
3
-
4
-
5
-
6
-
7
-
8
-
9
-
10
-
11
-
12
-
13
-
14
-
15
-
16
-
17
-
 18
18 -
 19
19 -
 20
20 -
 21
21 -
 22
22 -
 23
23 -
 24
24 -
 25
25 -
 26
26 -
 27
27 -
 28
28 -
29
-
30
-
31
-
32
-
33
-
34
-
35
-
36
 |
 |

English
23
ASUS All-in-one PC
ET1612I Series
4.
Mount the All-in-one PC onto a firm wall
by applying a standard wall mount kit
(pad and rack) to the wall mount screws.
Follow the instructions described in the
installation manual that came with your
wall mount kit.
3.
Secure the four wall mount
screws(included) to the rear panel holes.
•
The wall mount kit should comply
with VESA 75 standards, which can be
purchased separately.
•
To ensure safety, please read the wall
mount kit installation manual carefully
before mounting your All-in-one PC to
the wall.
-2
-1
-2
-1
-2
-1
2.
Remove the four plastic caps, from the
rear panel holes.