Asus H170I-PRO/CSM User Guide - Page 19
Wi-Fi antenna installation, Installing a DIMM
 |
View all Asus H170I-PRO/CSM manuals
Add to My Manuals
Save this manual to your list of manuals |
Page 19 highlights
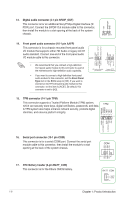
Installing a DIMM 1 To remove a DIMM A B 2 A A B 1.5 Wi-Fi antenna installation Connect the bundled ASUS 2T2R dual band Wi-Fi antenna connector to the Wi-Fi ports at the back of the chassis. IO Shield • Ensure that the ASUS 2T2R dual band Wi-Fi antenna is securely installed to the Wi-Fi ports. • Ensure that you install the Bluetooth driver before installing the Wi-Fi GO! software. • Ensure that the antenna is at least 20 cm away from all persons. The illustration above is for reference only. The I/O port layout may vary with models, but the Wi-Fi antenna installation procedure is the same for all models. ASUS H170I-PRO 1-11
-
 1
1 -
2
-
3
-
4
-
5
-
6
-
7
-
8
-
9
-
10
-
11
-
12
-
13
-
 14
14 -
 15
15 -
 16
16 -
 17
17 -
 18
18 -
 19
19 -
 20
20 -
 21
21 -
 22
22 -
 23
23 -
 24
24 -
25
-
26
-
27
-
28
-
29
-
30
-
31
-
32
-
33
-
34
-
35
-
36
-
37
 |
 |

ASUS H170I-PRO
1-11
Installing a DIMM
1
2
To remove a DIMM
B
A
B
A
A
1.5
Wi-Fi antenna installation
Connect the bundled ASUS 2T2R dual band Wi-Fi antenna connector to the Wi-Fi ports at
the back of the chassis.
IO Shield
•
Ensure that the ASUS 2T2R dual band Wi-Fi antenna is securely installed to the Wi-Fi
ports.
•
Ensure that you install the Bluetooth driver before installing the Wi-Fi GO! software.
•
Ensure that the antenna is at least 20 cm away from all persons.
The illustration above is for reference only. The I/O port layout may vary with models, but
the Wi-Fi antenna installation procedure is the same for all models.