Asus H87M-PRO H87M-PRO User's Manual - Page 140
Creating a RAID driver disk in Windows®
 |
View all Asus H87M-PRO manuals
Add to My Manuals
Save this manual to your list of manuals |
Page 140 highlights
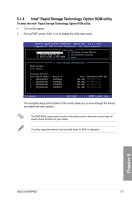
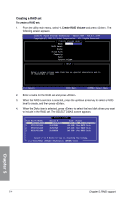
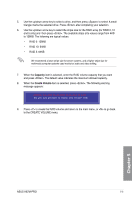
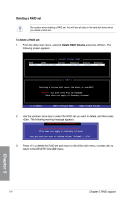
5.2.2 Creating a RAID driver disk in Windows® To create a RAID driver disk in Windows®: 1. Start Windows®. 2. Plug the USB floppy disk drive and insert a floppy disk. 3. Place the motherboard support DVD into the optical drive. 4. Go to Intel AHCI/RAID Driver menu then click Intel AHCI/RAID Driver path to open the RAID driver folder. 5. Select 32bit or 64bit folder depending on your operating system. Copy the files of the selected folder to the root path of your USB floppy disk drive. Write-protect the floppy disk to avoid a computer virus infection. 5.2.3 Installing the RAID driver during Windows® OS installation To install the RAID driver for Windows® 7 or later OS: 1. During the OS installation, click Load Driver to allow you to select the installation media containing the RAID driver. 2. Insert the USB flash drive with RAID driver into the USB port or the support DVD into the optical drive, and then click Browse. 3. Click the name of the device you've inserted, go to Drivers > RAID, and then select the RAID driver for the corresponding OS version. Click OK. 4. Follow the succeeding screen instructions to complete the installation. Before loading the RAID driver from a USB flash drive, you have to use another computer to copy the RAID driver from the support DVD to the USB flash drive. Chapter 5 5-8 Chapter 5: RAID support
-
 1
1 -
2
-
3
-
4
-
5
-
6
-
7
-
8
-
9
-
10
-
11
-
12
-
13
-
14
-
15
-
16
-
17
-
18
-
19
-
20
-
21
-
22
-
23
-
24
-
25
-
26
-
27
-
28
-
29
-
30
-
31
-
32
-
33
-
34
-
35
-
36
-
37
-
38
-
39
-
40
-
41
-
42
-
43
-
44
-
45
-
46
-
47
-
48
-
49
-
50
-
51
-
52
-
53
-
54
-
55
-
56
-
57
-
58
-
59
-
60
-
61
-
62
-
63
-
64
-
65
-
66
-
67
-
68
-
69
-
70
-
71
-
72
-
73
-
74
-
75
-
76
-
77
-
78
-
79
-
80
-
81
-
82
-
83
-
84
-
85
-
86
-
87
-
88
-
89
-
90
-
91
-
92
-
93
-
94
-
95
-
96
-
97
-
98
-
99
-
100
-
101
-
102
-
103
-
104
-
105
-
106
-
107
-
108
-
109
-
110
-
111
-
112
-
113
-
114
-
115
-
116
-
117
-
118
-
119
-
120
-
121
-
122
-
123
-
124
-
125
-
126
-
127
-
128
-
129
-
130
-
131
-
132
-
133
-
134
-
 135
135 -
 136
136 -
 137
137 -
 138
138 -
 139
139 -
 140
140 -
 141
141 -
 142
142 -
 143
143 -
 144
144 -
 145
145
 |
 |