Asus Hummingbird User Guide - Page 84
Arrays Information
 |
View all Asus Hummingbird manuals
Add to My Manuals
Save this manual to your list of manuals |
Page 84 highlights
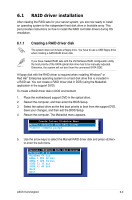
6. A confirmation screen appears. Press to confirm the array creation. Create the array?[Y] [Adapter] [Create] [Delete] Select free disks to create **I04NCDErXeRMCPTaaaao01tixpredatScALiireztrveyDSSae((iAAylMMsTTBBkAA))::N:::aHHmiiR22ettA00aaI00D00cc022hh44ii11 HDS721010KLA330 HDS721010KLA330 Stripe Size : 64KB Quick Init : No Cache Mode : Write Back Array Name : Disks ID : 0 1 NEXT Size Speed Status 1TB SATA II FREE 1TB SATA II FREE Marvell BIOS Setup (c) 2006 Marvell Technology, Ltd. 7. The newly created array appears in Arrays Information. ENTER/SPACE:Select, ESC:Back/Exit [Adapter] [Create] [Delete] Adapter 1 Arrays Information: ID Array Name Size 0 2TB Level Status RAID0 ONLINE Disks Information: ID Port Disk Name 0 0 SATA: Hitachi HDS721010KLA330 4 1 SATA: Hitachi HDS721010KLA330 Stripe Members 64KB 0, 4 Size Speed Status 1TB SATA II FULLASSIGN 1TB SATA II FULLASSIGN Marvell BIOS Setup (c) 2006 Marvell Technology, Ltd. 5-8 Chapter 5: RAID configuration
-
 1
1 -
2
-
3
-
4
-
5
-
6
-
7
-
8
-
9
-
10
-
11
-
12
-
13
-
14
-
15
-
16
-
17
-
18
-
19
-
20
-
21
-
22
-
23
-
24
-
25
-
26
-
27
-
28
-
29
-
30
-
31
-
32
-
33
-
34
-
35
-
36
-
37
-
38
-
39
-
40
-
41
-
42
-
43
-
44
-
45
-
46
-
47
-
48
-
49
-
50
-
51
-
52
-
53
-
54
-
55
-
56
-
57
-
58
-
59
-
60
-
61
-
62
-
63
-
64
-
65
-
66
-
67
-
68
-
69
-
70
-
71
-
72
-
73
-
74
-
75
-
76
-
77
-
78
-
 79
79 -
 80
80 -
 81
81 -
 82
82 -
 83
83 -
 84
84 -
 85
85 -
 86
86 -
 87
87 -
 88
88 -
 89
89 -
90
-
91
-
92
-
93
-
94
-
95
-
96
-
97
-
98
-
99
-
100
-
101
-
102
-
103
-
104
-
105
-
106
-
107
-
108
-
109
-
110
-
111
-
112
 |
 |
