Asus N4L-VM DH N4L-VM DH User's Manual English Edition - Page 142
JMicron, RAID Configuration
 |
View all Asus N4L-VM DH manuals
Add to My Manuals
Save this manual to your list of manuals |
Page 142 highlights
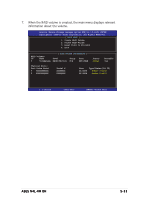
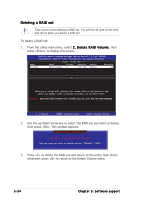
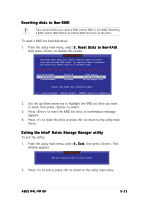
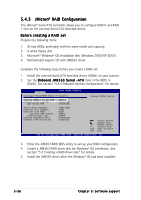
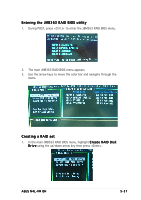
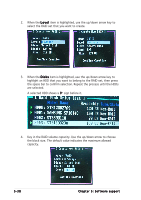
5.4.3 JMicron® RAID Configuration The JMicron® Serial ATA controller allows you to configure RAID 0 and RAID 1 sets on the external Serial ATA hard disk drives. Before creating a RAID set Prepare the following items: 1. At two HDDs, preferably with the same model and capacity. 2. A white floppy disk 3. Microsoft® Windows® OS installation disk (Windows 2000/XP/2003) 4. Motherboard support CD with JMB363 driver Complete the following steps before you create a RAID set: 1. Install the external Serial ATA hard disk drives (HDDs) on your system. 2. Set the O n b o a r d J M B 3 6 3 S e r i a l - A T A item in the BIOS to [RAID]. See section "4.4.4 Onboard Devices Configuration" for details. Advanced BIOS SETUP UTILITY Configure Win627EHF Super IO Chipset Onboard JMB363 Serial-ATA Onboard PCIEX GbE LAN LAN Option ROM [RAID] [Enabled] [Disabled] Onboard JMB363 Serial- Serial Port1 Address Parallel Port Address Parallel Port Mode ECP Mode DMA Channel Parallel Port IRQ Onboard Game/MIDI Port Onboard 1394 Controller [3F8/IRQ4] [378] [ECP] [DMA3] [IRQ7] [Disabled] [Enabled] Select Screen Select Item +- Change Option F1 General Help F10 Save and Exit ESC Exit v02.58 (C)Copyright 1985-2005, American Megatrends, Inc. 3. Enter the JMB363 RAID BIOS utility to set up your RAID configuration. 4. Create a JMB363 RAID driver disk for Windows® OS installation. See section "5.5 Creating a RAID driver disk" for details. 5. Install the JMB363 driver after the Windows® OS had been installed. 5-36 Chapter 5: Software support
-
 1
1 -
2
-
3
-
4
-
5
-
6
-
7
-
8
-
9
-
10
-
11
-
12
-
13
-
14
-
15
-
16
-
17
-
18
-
19
-
20
-
21
-
22
-
23
-
24
-
25
-
26
-
27
-
28
-
29
-
30
-
31
-
32
-
33
-
34
-
35
-
36
-
37
-
38
-
39
-
40
-
41
-
42
-
43
-
44
-
45
-
46
-
47
-
48
-
49
-
50
-
51
-
52
-
53
-
54
-
55
-
56
-
57
-
58
-
59
-
60
-
61
-
62
-
63
-
64
-
65
-
66
-
67
-
68
-
69
-
70
-
71
-
72
-
73
-
74
-
75
-
76
-
77
-
78
-
79
-
80
-
81
-
82
-
83
-
84
-
85
-
86
-
87
-
88
-
89
-
90
-
91
-
92
-
93
-
94
-
95
-
96
-
97
-
98
-
99
-
100
-
101
-
102
-
103
-
104
-
105
-
106
-
107
-
108
-
109
-
110
-
111
-
112
-
113
-
114
-
115
-
116
-
117
-
118
-
119
-
120
-
121
-
122
-
123
-
124
-
125
-
126
-
127
-
128
-
129
-
130
-
131
-
132
-
133
-
134
-
135
-
136
-
 137
137 -
 138
138 -
 139
139 -
 140
140 -
 141
141 -
 142
142 -
 143
143 -
 144
144 -
 145
145 -
 146
146 -
 147
147 -
148
 |
 |