Asus P2-99 P2-99 User Manual - Page 83
The ASUS S370 CPU Card
 |
View all Asus P2-99 manuals
Add to My Manuals
Save this manual to your list of manuals |
Page 83 highlights
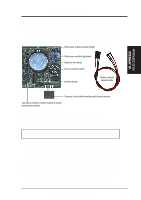
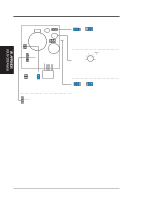
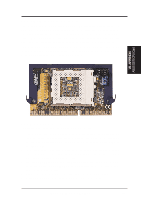
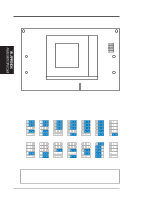
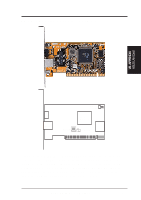
VII. APPENDIX The ASUS S370 CPU Card The optional ASUS S370 CPU card allows Slot 1 motherboards to accept socket 370 processors. The ASUS S370 CPU card gives Slot 1 motherboard owners an inexpensive way to upgrade their Pentium II computers using lower costing socket 370 processors. Since socket 370 processors are based on the Pentium II design, the only difference is the connector and the amount of internal cache within the processor. The following picture shows the ASUS S370 CPU card with a plastic retainer attached to the edge. The retainer is used to hold the ASUS S370 CPU card in place using the motherboard's Slot 1 retention mechanism. ASUS S370 CPU Card Retainer VII. APPENDIX ASUS S370 CPU Card Fin Fin Slot 1 Compatible Connector Using the ASUS S370 The general procedure for using the ASUS S370 CPU card: 1. Check the voltage setting for your socket 370 processor using the jumpers on the card if necessary. For current socket 370 processors, the default setting should be used. See the reverse side of the ASUS S370 CPU card or the next page for voltage settings. 2. Install the socket 370 processor. Installation of socket 370 processors is exactly like socket 7 processors. Lift the brown lever to 90° to install the processor and lower the brown lever to lock the processor. 3. Insert the ASUS S370 CPU card into Slot 1 on the motherboard. The two fins on the sides of the ASUS S370 CPU card must catch on the retention mechanism so that it locks in place. 4. Connect the socket 370 processor's fan connector to the motherboard. 5. Make sure that no wires or objects come in contact with the fan. ASUS P2-99 User's Manual 83
-
 1
1 -
2
-
3
-
4
-
5
-
6
-
7
-
8
-
9
-
10
-
11
-
12
-
13
-
14
-
15
-
16
-
17
-
18
-
19
-
20
-
21
-
22
-
23
-
24
-
25
-
26
-
27
-
28
-
29
-
30
-
31
-
32
-
33
-
34
-
35
-
36
-
37
-
38
-
39
-
40
-
41
-
42
-
43
-
44
-
45
-
46
-
47
-
48
-
49
-
50
-
51
-
52
-
53
-
54
-
55
-
56
-
57
-
58
-
59
-
60
-
61
-
62
-
63
-
64
-
65
-
66
-
67
-
68
-
69
-
70
-
71
-
72
-
73
-
74
-
75
-
76
-
77
-
 78
78 -
 79
79 -
 80
80 -
 81
81 -
 82
82 -
 83
83 -
 84
84 -
 85
85 -
 86
86 -
 87
87 -
 88
88 -
89
-
90
-
91
-
92
-
93
-
94
-
95
-
96
 |
 |
