Asus P4P800-MX P4P800-MX user's manual - Page 25
Installing a DIMM
 |
View all Asus P4P800-MX manuals
Add to My Manuals
Save this manual to your list of manuals |
Page 25 highlights
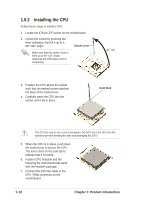
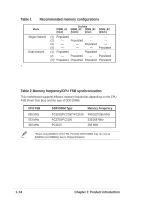
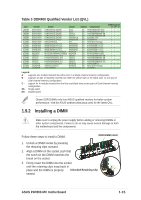
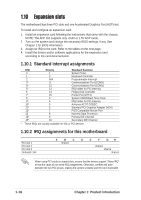
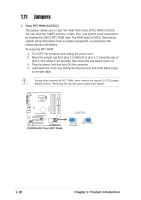
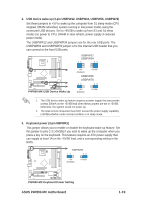
Table 3 DDR400 Qualified Vendor List (QVL) Size 256MB 512MB 256MB 512MB 256MB 512MB 512MB 256MB 512MB 256MB 512MB 256MB 512MB 256MB 512MB 256MB 512MB 256MB 512MB 512MB Vendor KINGSTON KINGSTON KINGSTON KINGSTON KINGSTON KINGSTON KINGSTON SAMSUNG SAMSUNG SAMSUNG SAMSUNG MICRON MICRON Infineon Infineon Infineon Infineon CORSAIR CORSAIR CORSAIR Model Brand Side(s) Component KVR400X64C3A/256 KVR400X64C3A/512 KVR400X64C3A/256 KVR400X64C3A/512 KVR400X64C3A/256 KVR400X64C3A/512 KHX3200A/512 M368L3223ETM-CCC M368L6423ETM-CCC M368L3223FTN-CCC M368L6423FTN-CCC MT8VDDT3264AG-40BCB MT16VDDT6464AG-40BCB HYS64D32300GU-5-B HYS64D64320GU-5-B HYS64D32300HU-5-C HYS64D64320HU-5-C CMX256A-3200C2PT CMX512-3200C2 VS512MB400 Hynix SS Hynix DS Infineon SS Infineon DS KINGSTON SS KINGSTON DS N/A DS SAMSUNG SS SAMSUNG DS SAMSUNG SS SAMSUNG DS MICRON SS MICRON DS Infineon SS Infineon DS Infineon SS Infineon DS Winbond SS Winbond DS VALUE seLecT DS HY5DU56822BT-D43 HY5DU56822BT-D43 HYB25D256800BT-5B HYB25D256809BT-5B D3208DL2T-5 D328DIB-50 Heat-Sink Package K4H560838E-TCCC K4H560838E-TCCC K4H560838F-TCCC K4H560838F-TCCC MT46V32M8TG-5BC MT46V32M8TG-5BC HYB25D256800BT-5B HYB25D256800BT-5B HYB25D256800CE-5C HYB25D256800CE-5C W942508BH-5 Heat-Sink Package VS32M8-5 DIMM Support A* B* C* ••• ••• •• ••• ••• • •• ••• • •• •• ••• • •• •• •• • • ••• •• ••• Legend: A - supports one module inserted into either slot, in a Single-channel memory configuration. B - supports on pair of modules inserted into either the yellow slots or the black slots as one pair of Dual-channel memory configuration. C - support for 4 modules inserted into the blue and black slots as two pairs of Dual-channel memory configuration. SS - Single-sided DS - Double-sided Obtain DDR DIMMs only from ASUS qualified vendors for better system performance. Visit the ASUS website (www.asus.com) for the latest QVL. 1.9.2 Installing a DIMM Make sure to unplug the power supply before adding or removing DIMMs or other system components. Failure to do so may cause severe damage to both the motherboard and the components. Follow these steps to install a DIMM. DDR DIMM notch 1. Unlock a DIMM socket by pressing the retaining clips outward. 2. Align a DIMM on the socket such that the notch on the DIMM matches the break on the socket. 3. Firmly insert the DIMM into the socket until the retaining clips snap back in place and the DIMM is properly Unlocked Retaining Clip seated. ASUS P4P800-MX motherboard 1-15
-
 1
1 -
2
-
3
-
4
-
5
-
6
-
7
-
8
-
9
-
10
-
11
-
12
-
13
-
14
-
15
-
16
-
17
-
18
-
19
-
 20
20 -
 21
21 -
 22
22 -
 23
23 -
 24
24 -
 25
25 -
 26
26 -
 27
27 -
 28
28 -
 29
29 -
 30
30 -
31
-
32
-
33
-
34
-
35
-
36
-
37
-
38
-
39
-
40
-
41
-
42
-
43
-
44
-
45
-
46
-
47
-
48
-
49
-
50
-
51
-
52
-
53
-
54
-
55
-
56
-
57
-
58
-
59
-
60
-
61
-
62
-
63
-
64
-
65
-
66
-
67
-
68
-
69
-
70
-
71
-
72
 |
 |
