Asus P4P800 Motherboard DIY Troubleshooting Guide - Page 35
Create Array Menu, Main Menu, Disk/volume Information, Create Volume
 |
View all Asus P4P800 manuals
Add to My Manuals
Save this manual to your list of manuals |
Page 35 highlights
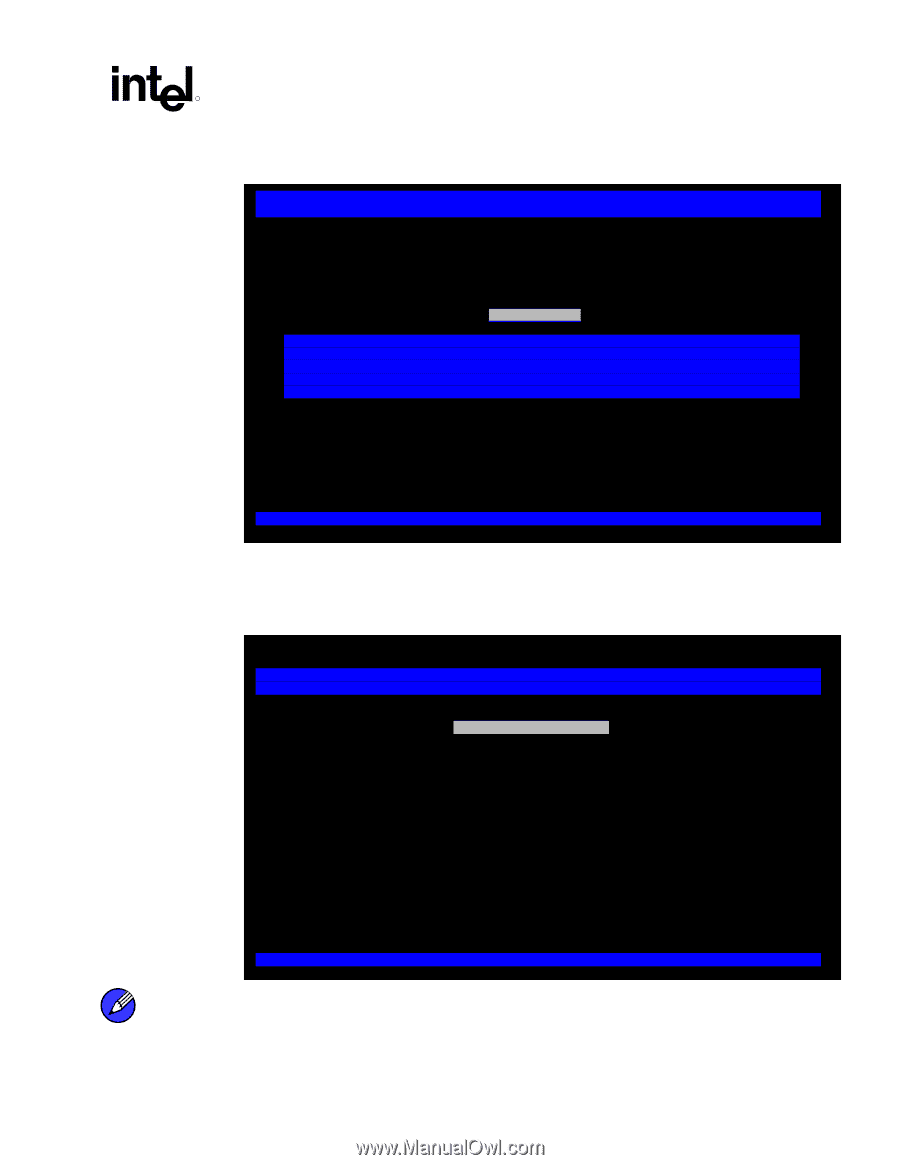
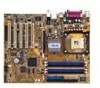
Intel RAID Option ROM R 6. Press the key to create the specified volume and the following prompt will appear: Intel(R) RAID for Serial ATA - RAID Configuration Utility 0 8 Copyright(C) 2003 Intel Corporation. All Rights Reserved. v3.0.0.2307 1 CREATE ARRAY MENU ║ ║ ║ Name: RAID_Volume1 ║ ║ Strip Size: 128KB ║ ║ RAID Level: RAID0(Striping) ║ ║ Capacity: 223.5GB ║ ║ ║ ║ Create Volume ║ ║ ║ ║══╝ ║ Are you sure you want to create this RAID volume (Y/N) ║ ║══╗ ║ ║ ║ ║ ║ ║ ║ Press "ENTER" to Create the specified volume ║ ║ ║ ║ ║ ║ ║ ║ ║ [↑↓]Change [TAB]-Next [ESC]-Previous Menu [ENTER]-Select 8 7. Confirm this selection by pressing the key after the prompt. The window will be returned to the main menu with an updated status similar to the following: Intel(R) RAID for Serial ATA - RAID Configuration Utility 0 0 Copyright(C) 2003 Intel Corporation. All Rights Reserved. v3.0.0.2307 1 MAIN MENU ║ ║ ║ 1. Create RAID Volume ║ ║ 2. Delete RAID Volume ║ ║ 3. Reset Disks to Non-RAID ║ ║ 4. Exit ║ ║ ║ DISK/VOLUME INFORMATION ║ ║ ║ RAID Volumes: ║ ║ ID Name Level Strip Size Status Bootable ║ ║ 0 RAID_Volume1 RAID0(Stripe) 128KB 223.5GB Normal Yes ║ ║ ├ ST3120023AS 3KA0J1ZJ Port0 111.7GB Normal ║ ║ └ ST3120023AS 3KA0H0M0 Port1 111.7GB Normal ║ ║ ║ ║ Non-RAID Disks: ║ ║ None defined. ║ ║ ║ [↑↓]-Select [ESC]-Exit [ENTER]-Select Menu 8 Note: The disk/volume information listed for your system can differ from the following example. User's Manual 35
-
 1
1 -
2
-
3
-
4
-
5
-
6
-
7
-
8
-
9
-
10
-
11
-
12
-
13
-
14
-
15
-
16
-
17
-
18
-
19
-
20
-
21
-
22
-
23
-
24
-
25
-
26
-
27
-
28
-
29
-
 30
30 -
 31
31 -
 32
32 -
 33
33 -
 34
34 -
 35
35 -
 36
36 -
 37
37 -
 38
38 -
 39
39 -
 40
40 -
41
-
42
-
43
-
44
-
45
-
46
-
47
-
48
-
49
-
50
-
51
-
52
-
53
-
54
-
55
-
56
-
57
-
58
-
59
-
60
-
61
-
62
-
63
-
64
-
65
-
66
-
67
-
68
-
69
-
70
-
71
-
72
-
73
-
74
-
75
-
76
-
77
-
78
-
79
-
80
-
81
-
82
-
83
-
84
-
85
 |
 |