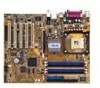
Asus P4P800 Motherboard DIY Troubleshooting Guide - Page 42
Installation Steps, Installing the Intel Application Accelerator RAID Edition, User's Manual - downloads
 |
View all Asus P4P800 manuals
Add to My Manuals
Save this manual to your list of manuals |
Page 42 highlights
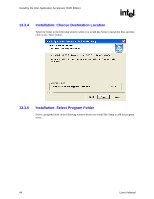
Installing the Intel Application Accelerator RAID Edition R If needed, the Intel Application Accelerator RAID Edition can also be downloaded from the following Intel website: http://support.intel.com/support/go/iaa/tti_r.htm The Intel Application Accelerator RAID Edition is available for supported operating systems (see http://support.intel.com/support/chipsets/iaa_raid/supported.htm) in both English (iaarxx_enu.exe) and multi-language (iaarxx_multi.exe) versions. An included README.TXT file covers topics such as system requirements, basic installation instructions, and advanced installation instructions. A Release Notes document is located at the following website: http://appsr.intel.com/scripts-df/Product_Filter.asp?ProductID=961 A Known Compatibility Issues document is located at the following website: http://support.intel.com/support/chipsets/iaa_raid/compat.htm After the Intel Application Accelerator RAID Edition has been downloaded from the Intel website to a known location on your hard drive, you need to run the file iaarxx_enu.exe (English version) or iaarxx_multi.exe (multi-language). Running the file can be done by double-clicking on the file name. The installation program should launch after you double-click on the file name. Click on the "Next" button at the Welcome screen. Read the license agreement and click on the "Yes" button to accept the license terms and continue. Click on the "Next" button to install the driver in the default folder location. Click on the "Next" button to create the default Program Folder. The driver files will now be installed. When finished installing, select the "Yes" button for the reboot option and click on the "Finish" button to restart your computer. The Intel Application Accelerator RAID Edition should now be installed. Note: The instructions above assume that the Intel RAID Option ROM and BIOS have been configured correctly and the RAID driver has been installed using the F6 installation method (see Section 11.2 titled 'Installation Using F6 Method' for additional information). 13.3.1 Installation Steps After clicking on the .EXE file, installation will begin and the following screen will temporarily appear: 42 User's Manual
-
 1
1 -
2
-
3
-
4
-
5
-
6
-
7
-
8
-
9
-
10
-
11
-
12
-
13
-
14
-
15
-
16
-
17
-
18
-
19
-
20
-
21
-
22
-
23
-
24
-
25
-
26
-
27
-
28
-
29
-
30
-
31
-
32
-
33
-
34
-
35
-
36
-
 37
37 -
 38
38 -
 39
39 -
 40
40 -
 41
41 -
 42
42 -
 43
43 -
 44
44 -
 45
45 -
 46
46 -
 47
47 -
48
-
49
-
50
-
51
-
52
-
53
-
54
-
55
-
56
-
57
-
58
-
59
-
60
-
61
-
62
-
63
-
64
-
65
-
66
-
67
-
68
-
69
-
70
-
71
-
72
-
73
-
74
-
75
-
76
-
77
-
78
-
79
-
80
-
81
-
82
-
83
-
84
-
85
 |
 |
