Asus P5L-MX IPAT P5L-MX/IPAT user's manual - Page 22
Installling the CPU heatsink and fan
 |
View all Asus P5L-MX IPAT manuals
Add to My Manuals
Save this manual to your list of manuals |
Page 22 highlights
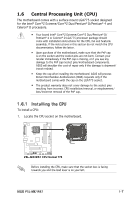
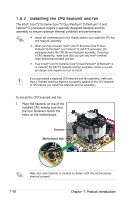
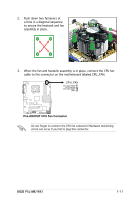
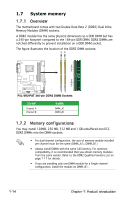
1.6.2 Installling the CPU heatsink and fan The Intel® Core™2 Extreme/Core™2 Duo/Pentium® D/Pentium® 4 and Celeron® D processors require a specially designed heatsink and fan assembly to ensure optimum thermal condition and performance. • Install the motherboard to the chassis before you install the CPU fan and heatsink assembly • When you buy a boxed Intel® Core™2 Extreme/Core™2 Duo/ Pentium® D/Pentium® 4 or Celeron® D LGA775 processor, the packageincludes the CPU fan and heatsink assembly. If you buy a CPU separately, make sure that you use only Intel®‑certified multi‑directional heatsink and fan. • Your I Intel® Core™2 Extreme/Core™2 Duo/Pentium® D/Pentium® 4 or Celeron® D LGA775 heatsink and fan assembly comes in a pushpin design and requires no tool to install. If you purchased a separate CPU heatsink and fan assembly, make sure that a Thermal Interface Material is properly applied to the CPU heatsink or CPU before you install the heatsink and fan assembly. To install the CPU heatsink and fan: 1. Place the heatsink on top of the installed CPU, making sure that the four fasteners match the holes on the motherboard. Fastener Motherboard hole 1-10 Make sure each fastener is oriented as shown, with the narrow groove directed outward. Chapter 1: Product introduction
-
 1
1 -
2
-
3
-
4
-
5
-
6
-
7
-
8
-
9
-
10
-
11
-
12
-
13
-
14
-
15
-
16
-
 17
17 -
 18
18 -
 19
19 -
 20
20 -
 21
21 -
 22
22 -
 23
23 -
 24
24 -
 25
25 -
 26
26 -
 27
27 -
28
-
29
-
30
-
31
-
32
-
33
-
34
-
35
-
36
-
37
-
38
-
39
-
40
-
41
-
42
-
43
-
44
-
45
-
46
-
47
-
48
-
49
-
50
-
51
-
52
-
53
-
54
-
55
-
56
-
57
-
58
-
59
-
60
-
61
-
62
-
63
-
64
-
65
-
66
-
67
-
68
-
69
-
70
-
71
-
72
-
73
-
74
-
75
-
76
-
77
-
78
 |
 |
