Asus P5VD2 MX P5VD2-MX User's Manual for English Edition - Page 100
RAID Configuration - lan driver
 |
UPC - 610839154326
View all Asus P5VD2 MX manuals
Add to My Manuals
Save this manual to your list of manuals |
Page 100 highlights
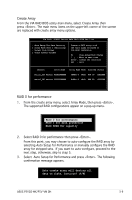
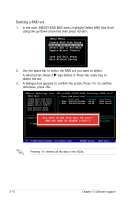
3.3.2 JMicron® RAID Configuration The JMicron® Serial ATA controller allows you to configure RAID 0 and RAID 1 sets on the external Serial ATA hard disk drives. Before creating a RAID set Prepare the following items: 1. Two HDDs, preferably with the same model and capacity. 2. A write-enabled floppy disk 3. Microsoft® Windows® OS installation disk (Windows 2000/XP/2003) 4. Motherboard support CD with JMB363 driver Complete the following steps before you create a RAID set: 1. Install the external Serial ATA hard disk drives (HDDs) on your system. 2. Set the JMicron RAID Controller item in the BIOS to [RAID]. See section "2.4.4 Onboard Devices Configuration" for details. Advanced Phoenix-Award BIOS CMOS Setup Utility Onboard Devices Configuration Select Menu JMicron RAID controller SATA Controller SATA Controller Mode Ex-SATA/PCI-E*1 Option HDA Controller Onboard LAN Onboard LAN Boot ROM Serial Port1 Address Parallel Port Address Parallel Port Mode ECP Mode Use DMA [IDE] [Enabled] [IDE] [Ex-SATA] [Auto] [Enabled] [Disabled] [3F8/IRQ4] [378/IRQ7] [Bi-Directional] [3] Item Specific Help Press [Enter] to set F1:Help ESC: Exit ↑↓ : Select Item →←: Select Menu -/+: Change Value F5: Setup Defaults Enter: Select SubMenu F10: Save and Exit 3. Enter the JMB363 RAID BIOS utility to set up your RAID configuration. 4. Create a JMB363 RAID driver disk for Windows® OS installation. See section "3.4 Creating a RAID driver disk" for details. 5. Install the JMB363 driver after the Windows® OS had been installed. 3-12 Chapter 3: Software support
-
 1
1 -
2
-
3
-
4
-
5
-
6
-
7
-
8
-
9
-
10
-
11
-
12
-
13
-
14
-
15
-
16
-
17
-
18
-
19
-
20
-
21
-
22
-
23
-
24
-
25
-
26
-
27
-
28
-
29
-
30
-
31
-
32
-
33
-
34
-
35
-
36
-
37
-
38
-
39
-
40
-
41
-
42
-
43
-
44
-
45
-
46
-
47
-
48
-
49
-
50
-
51
-
52
-
53
-
54
-
55
-
56
-
57
-
58
-
59
-
60
-
61
-
62
-
63
-
64
-
65
-
66
-
67
-
68
-
69
-
70
-
71
-
72
-
73
-
74
-
75
-
76
-
77
-
78
-
79
-
80
-
81
-
82
-
83
-
84
-
85
-
86
-
87
-
88
-
89
-
90
-
91
-
92
-
93
-
94
-
 95
95 -
 96
96 -
 97
97 -
 98
98 -
 99
99 -
 100
100 -
 101
101 -
 102
102 -
 103
103 -
 104
104 -
 105
105 -
106
-
107
-
108
 |
 |
