Asus PA248Q User Manual - Page 20
Aspect Control, Position, Focus, AUTO Adjust., PIP/PBP Setting, PIP/PBP Mode, Switch, HDMI - displayport 1 2
 |
View all Asus PA248Q manuals
Add to My Manuals
Save this manual to your list of manuals |
Page 20 highlights
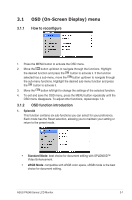
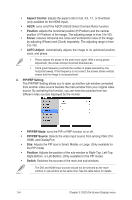
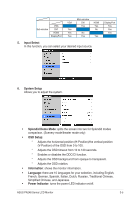
• Aspect Control: adjusts the aspect ratio to full, 4:3, 1:1, or OverScan (only available for the HDMI input). • ASCR: turns on/off the ASCR (ASUS Smart Contrast Ratio) function. • Position: adjusts the horizontal position (H-Position) and the vertical position (V-Position) of the image. The adjusting range is from 0 to 100. • Focus: reduces Horizonal-line noise and Vertical-line noise of the image by adjusting (Phase) and (Clock) separately. The adjusting range is from 0 to 100. • AUTO Adjust.: Automatically adjusts the image to its optimized position, clock, and phase. • Phase adjusts the phase of the pixel clock signal. With a wrong phase adjustment, the screen shows horizontal disturbances. • Clock (pixel frequency) controls the number of pixels scanned by one horizontal sweep. If the frequency is not correct, the screen shows vertical stripes and the image is not proportional. 4. PIP/PBP Setting The PIP/PBP Setting allows you to open up another sub-window connected from another video source besides the main-window from your original video source. By activating this function, you can have two pictures from two different video sources displayed by the monitor. • PIP/PBP Mode: turns the PIP or PBP function on or off. • PIP/PBP Source: Selects the video input source from among VGA, DVI, HDMI, and DisplayPort. • Size: Adjusts the PIP size to Small, Middle, or Large. (Only available for the PIP mode) • Position: Adjusts the position of the sub-window to Right-Top, Left-Top, Right-Bottom, or Left-Bottom. (Only available for the PIP mode) • Switch: Switches the sources of the main and sub-windows. The DVI and HDMI input sources should not be selected as the mainwindow or sub-window at the same time. See the table below for details. 3-4 Chapter 3: OSD (On-Screen Display) menu
-
 1
1 -
2
-
3
-
4
-
5
-
6
-
7
-
8
-
9
-
10
-
11
-
12
-
13
-
14
-
 15
15 -
 16
16 -
 17
17 -
 18
18 -
 19
19 -
 20
20 -
 21
21 -
 22
22 -
 23
23 -
 24
24 -
 25
25
 |
 |