Asus PRIME Z270M-PLUS PRIME Z270M-PLUS Users manual ENGLISH - Page 13
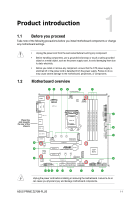
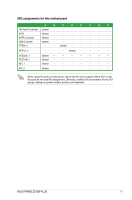
DDR4 DIMM slots, M.2 socket 3, Intel, Z270 Serial ATA 6.0Gb/s ports 7-pin SATA6G_1~4
 |
View all Asus PRIME Z270M-PLUS manuals
Add to My Manuals
Save this manual to your list of manuals |
Page 13 highlights
• We recommend that you use an EATX 12V Specification 2.0‑compliant power supply unit (PSU) with a minimum of 300W power rating. This PSU type has 24-pin and 8-pin power plugs. EATX12V GND GND GND GND PIN 1 +12V DC +12V DC +12V DC +12V DC • DO NOT forget to connect the 8-pin EATX +12V power plug. Otherwise, the system will not boot up. • We recommend that you use a PSU with higher power output when configuring a system with more power-consuming devices or when you intend to install additional devices. The system may become unstable or may not boot up if the power is inadequate. EATXPWR +3 Volts +12 Volts +12 Volts +5V Standby Power OK GND +5 Volts GND +5 Volts GND +3 Volts +3 Volts PIN 1 GND +5 Volts +5 Volts +5 Volts -5 Volts GND GND GND PSON# GND -12 Volts +3 Volts • If you are uncertain about the minimum power supply requirement for your system, refer to the Recommended Power Supply Wattage Calculator at http://support.asus.com/ PowerSupplyCalculator/PSCalculator.aspx?SLanguage=en-us for details. 3. M.2 socket 3 These sockets allow you to install an M.2 (NGFF) SSD module. • These sockets support M Key and 2242/2260/2280 storage devices. • When a device in SATA mode is installed on the M.2_1 socket, SATA_1 port cannot be used. M.2(SOCKET3) 4. Intel® LGA1151 CPU socket Install Intel® LGA1151 CPU into this surface mount LGA1151 socket, which is designed for 7th/6th Generation Intel® Core™ i7 / i5 / i3, Pentium®, and Celeron® processors. For more details, refer to Central Processing Unit (CPU). 5. DDR4 DIMM slots Install 2 GB, 4 GB, 8 GB, and 16 GB unbuffered non-ECC DDR4 DIMMs into these DIMM sockets. For more details, refer to System memory. 6. Intel® Z270 Serial ATA 6.0Gb/s ports (7-pin SATA6G_1~4) These ports connect to Serial ATA 6.0 Gb/s hard disk drives via Serial ATA 6.0 Gb/s signal cables. When using hot-plug and NCQ, set the SATA Mode Selection item in the BIOS to [AHCI]. SATA6G GND RSATA_TXP RSATA_TXN GND RSATA_RXN RSATA_RXP GND ASUS PRIME Z270M-PLUS 1-3
-
 1
1 -
2
-
3
-
4
-
5
-
6
-
7
-
 8
8 -
 9
9 -
 10
10 -
 11
11 -
 12
12 -
 13
13 -
 14
14 -
 15
15 -
 16
16 -
 17
17 -
 18
18 -
19
-
20
-
21
-
22
-
23
-
24
-
25
-
26
-
27
-
28
-
29
-
30
-
31
-
32
-
33
-
34
-
35
-
36
-
37
-
38
-
39
-
40
-
41
-
42
-
43
-
44
-
45
-
46
-
47
-
48
-
49
-
50
-
51
-
52
-
53
-
54
-
55
-
56
-
57
-
58
-
59
-
60
-
61
-
62
-
63
-
64
-
65
-
66
-
67
-
68
-
69
-
70
-
71
-
72
-
73
-
74
-
75
-
76
-
77
-
78
-
79
-
80
 |
 |