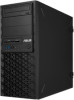
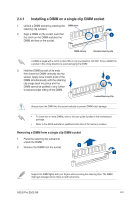
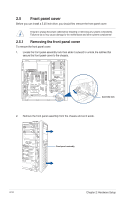
Asus Pro E500 G6 User Manual - Page 32
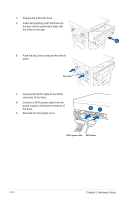
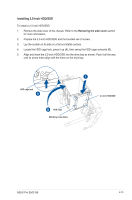
Connect the SATA cable and SATA, power cable to the 3.5-inch HDD.
 |
View all Asus Pro E500 G6 manuals
Add to My Manuals
Save this manual to your list of manuals |
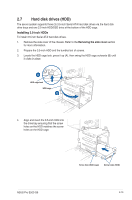
Page 32 highlights
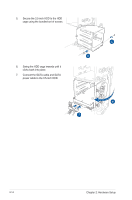
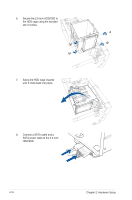
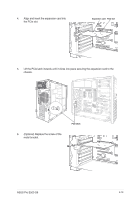
5. Secure the 3.5-inch HDD to the HDD cage using the bundled set of screws. 6. Swing the HDD cage inwards until it clicks back into place. 7. Connect the SATA cable and SATA power cable to the 3.5-inch HDD. 2-14 Chapter 2: Hardware Setup
-
 1
1 -
2
-
3
-
4
-
5
-
6
-
7
-
8
-
9
-
10
-
11
-
12
-
13
-
14
-
15
-
16
-
17
-
18
-
19
-
20
-
21
-
22
-
23
-
24
-
25
-
26
-
 27
27 -
 28
28 -
 29
29 -
 30
30 -
 31
31 -
 32
32 -
 33
33 -
 34
34 -
 35
35 -
 36
36 -
 37
37 -
38
-
39
-
40
-
41
-
42
-
43
-
44
-
45
-
46
-
47
-
48
-
49
-
50
-
51
-
52
-
53
-
54
-
55
-
56
-
57
-
58
-
59
-
60
-
61
-
62
-
63
-
64
-
65
-
66
-
67
-
68
-
69
-
70
-
71
-
72
-
73
-
74
-
75
-
76
-
77
-
78
-
79
-
80
-
81
-
82
-
83
-
84
-
85
-
86
-
87
-
88
-
89
-
90
-
91
-
92
-
93
-
94
-
95
-
96
-
97
-
98
-
99
-
100
-
101
-
102
-
103
-
104
-
105
-
106
-
107
-
108
-
109
-
110
-
111
-
112
-
113
-
114
-
115
-
116
-
117
-
118
-
119
-
120
-
121
-
122
-
123
-
124
-
125
-
126
-
127
-
128
-
129
-
130
-
131
-
132
-
133
-
134
-
135
-
136
-
137
-
138
-
139
-
140
-
141
-
142
-
143
-
144
-
145
-
146
-
147
-
148
-
149
-
150
-
151
-
152
 |
 |

Chapter 2: Hardware Setup
2-14
5.
Secure the 3.5-inch HDD to the HDD
cage using the bundled set of screws.
6.
Swing the HDD cage inwards until it
clicks back into place.
7.
Connect the SATA cable and SATA
power cable to the 3.5-inch HDD.