Asus Pro E500 G6 User Manual - Page 36
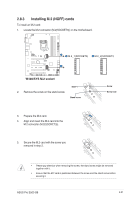
Installing an expansion card, metal bracket B.
 |
View all Asus Pro E500 G6 manuals
Add to My Manuals
Save this manual to your list of manuals |
Page 36 highlights
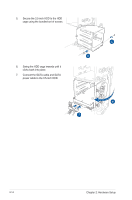
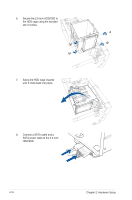
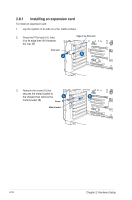
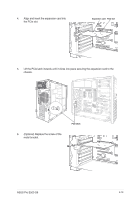
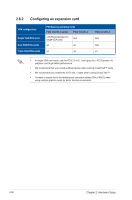
2.8.1 Installing an expansion card To install an expansion card: 1. Lay the system on its side on a flat, stable surface. 2. Press the PCIe latch (A), hold it by its edge then lift it towards the rear (B). PCIe latch Edge of the PCIe latch 3. Remove the screw (A) that secures the metal bracket to the chassis then remove the metal bracket (B). Screw Metal bracket 2-18 Chapter 2: Hardware Setup
-
 1
1 -
2
-
3
-
4
-
5
-
6
-
7
-
8
-
9
-
10
-
11
-
12
-
13
-
14
-
15
-
16
-
17
-
18
-
19
-
20
-
21
-
22
-
23
-
24
-
25
-
26
-
27
-
28
-
29
-
30
-
 31
31 -
 32
32 -
 33
33 -
 34
34 -
 35
35 -
 36
36 -
 37
37 -
 38
38 -
 39
39 -
 40
40 -
 41
41 -
42
-
43
-
44
-
45
-
46
-
47
-
48
-
49
-
50
-
51
-
52
-
53
-
54
-
55
-
56
-
57
-
58
-
59
-
60
-
61
-
62
-
63
-
64
-
65
-
66
-
67
-
68
-
69
-
70
-
71
-
72
-
73
-
74
-
75
-
76
-
77
-
78
-
79
-
80
-
81
-
82
-
83
-
84
-
85
-
86
-
87
-
88
-
89
-
90
-
91
-
92
-
93
-
94
-
95
-
96
-
97
-
98
-
99
-
100
-
101
-
102
-
103
-
104
-
105
-
106
-
107
-
108
-
109
-
110
-
111
-
112
-
113
-
114
-
115
-
116
-
117
-
118
-
119
-
120
-
121
-
122
-
123
-
124
-
125
-
126
-
127
-
128
-
129
-
130
-
131
-
132
-
133
-
134
-
135
-
136
-
137
-
138
-
139
-
140
-
141
-
142
-
143
-
144
-
145
-
146
-
147
-
148
-
149
-
150
-
151
-
152
 |
 |

Chapter 2: Hardware Setup
2-18
2.8.1
Installing an expansion card
To install an expansion card:
1.
Lay the system on its side on a flat, stable surface.
3.
Remove the screw (A) that
secures the metal bracket to
the chassis then remove the
metal bracket (B).
Metal bracket
PCIe latch
Edge of the PCIe latch
Screw
2.
Press the PCIe latch (A), hold
it by its edge then lift it towards
the rear (B).