Asus Prodigy P4S Prodigy P4 User's Manual E1099 for English Version - Page 22
edge of the front bezel.
 |
View all Asus Prodigy P4S manuals
Add to My Manuals
Save this manual to your list of manuals |
Page 22 highlights
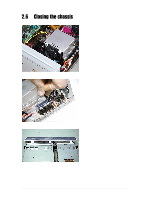
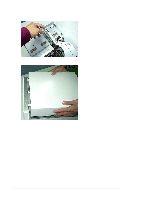
5. Lower the link-up bar and snap it gently into place. 6. Replace the top cover. To make sure the inner tabs slide into place properly, lay the cover down flush on top of the chassis about one centimeter behind the edge of the front bezel. Then, slide the cover forward while pressing in on the lower edges of the cover to engage the inner tabs. 22 Chapter 2: System Assemby
-
 1
1 -
2
-
3
-
4
-
5
-
6
-
7
-
8
-
9
-
10
-
11
-
12
-
13
-
14
-
15
-
16
-
 17
17 -
 18
18 -
 19
19 -
 20
20 -
 21
21 -
 22
22 -
 23
23 -
 24
24 -
 25
25 -
 26
26 -
 27
27 -
28
-
29
-
30
 |
 |

22
Chapter 2:
System Assemby
5.
Lower the link-up bar
and snap it gently into
place.
6.
Replace the top cover.
To make sure the inner
tabs slide into place
properly, lay the cover
down flush on top of the
chassis about one
centimeter behind the
edge of the front bezel.
Then, slide the cover
forward while pressing in
on the lower edges of
the cover to engage
the inner tabs.