Asus Pundit-R350 Pundit-R350 User''s Manual for English Edition - Page 38
Replacing or upgrading a pre-installed optical drive
 |
View all Asus Pundit-R350 manuals
Add to My Manuals
Save this manual to your list of manuals |
Page 38 highlights
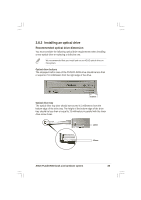
Replacing or upgrading a pre-installed optical drive In the future, you may need to replace a defective optical drive or upgrade an installed one: 1. Make sure the optical drive you intend to install complies with the recommended dimensions mentioned in page 35 to 36. 2. Lay the storage drive assembly on its top on a flat surface. 3. Remove four screws that secure the optical drive to the bay. Keep the screws for later use. 4. Push the old optical drive out from the bay, then set aside. 4 5. Follow steps 2 to 10 of the previous section to install a new optical drive. 38 Chapter 2: Basic installation
-
 1
1 -
2
-
3
-
4
-
5
-
6
-
7
-
8
-
9
-
10
-
11
-
12
-
13
-
14
-
15
-
16
-
17
-
18
-
19
-
20
-
21
-
22
-
23
-
24
-
25
-
26
-
27
-
28
-
29
-
30
-
31
-
32
-
 33
33 -
 34
34 -
 35
35 -
 36
36 -
 37
37 -
 38
38 -
 39
39 -
 40
40 -
 41
41 -
 42
42 -
 43
43 -
44
-
45
-
46
-
47
-
48
-
49
-
50
-
51
-
52
-
53
-
54
-
55
-
56
-
57
-
58
-
59
-
60
-
61
-
62
-
63
-
64
-
65
-
66
-
67
-
68
-
69
-
70
-
71
-
72
-
73
-
74
-
75
-
76
-
77
-
78
-
79
-
80
-
81
-
82
-
83
-
84
-
85
-
86
-
87
-
88
-
89
-
90
-
91
-
92
-
93
-
94
 |
 |

38
Chapter 2: Basic installation
Replacing or upgrading a pre-installed optical drive
In the future, you may need to replace a defective optical drive or upgrade
an installed one:
1.
Make sure the optical drive you intend to install complies with the
recommended dimensions mentioned in page 35 to 36.
2.
Lay the storage drive assembly on its top on a flat surface.
3.
Remove four screws that secure
the optical drive to the bay. Keep
the screws for later use.
4.
Push the old optical drive out
from the bay, then set aside.
5.
Follow steps 2 to 10 of the
previous section to install a new
optical drive.
4