Asus ROG MAXIMUS Z790 HERO BTF Users Manual English - Page 47
Expansion card installation, PCIe High Power Connector graphics card, installation
 |
View all Asus ROG MAXIMUS Z790 HERO BTF manuals
Add to My Manuals
Save this manual to your list of manuals |
Page 47 highlights
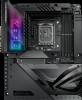
2.6 Expansion card installation 2.6.1 PCIe High Power Connector graphics card installation The illustrations in this section are for reference only. The motherboard and graphics card may vary between models, but the installation steps remain the same. 1. Install the golden fingers of the PCIe High Power Connector graphics card into the PCIe X16 slot and the GC_HPWR Power Output slot at the same time, and ensure the golden fingers are fully inserted into the slots. 2. Secure the PCIe High Power Connector graphics card to the chassis using the appropriate amount of screws. Chapter 2 Motherboard User Manual 2-11
-
 1
1 -
2
-
3
-
4
-
5
-
6
-
7
-
8
-
9
-
10
-
11
-
12
-
13
-
14
-
15
-
16
-
17
-
18
-
19
-
20
-
21
-
22
-
23
-
24
-
25
-
26
-
27
-
28
-
29
-
30
-
31
-
32
-
33
-
34
-
35
-
36
-
37
-
38
-
39
-
40
-
41
-
 42
42 -
 43
43 -
 44
44 -
 45
45 -
 46
46 -
 47
47 -
 48
48 -
 49
49 -
 50
50 -
 51
51 -
 52
52 -
53
-
54
-
55
-
56
-
57
-
58
-
59
-
60
-
61
-
62
-
63
-
64
-
65
-
66
-
67
-
68
-
69
-
70
-
71
-
72
-
73
-
74
 |
 |

Motherboard User Manual
2-11
Chapter 2
2.6
Expansion card installation
2.6.1
PCIe High Power Connector graphics card
installation
The illustrations in this section are for reference only. The motherboard and graphics card
may vary between models, but the installation steps remain the same.
1.
Install the golden fingers of the PCIe High Power Connector graphics card into the
PCIe X16 slot and the GC_HPWR Power Output slot at the same time, and ensure
the golden fingers are fully inserted into the slots.
2.
Secure the PCIe High Power Connector graphics card to the chassis using the
appropriate amount of screws.