Asus RS720-E7-RS24-EG RS720-E7-RS24-EG User's Manual - Page 39
Serial ATA HDD/ SAS HDD is fitted firmly, Orient and place the Serial ATA HDD
 |
View all Asus RS720-E7-RS24-EG manuals
Add to My Manuals
Save this manual to your list of manuals |
Page 39 highlights
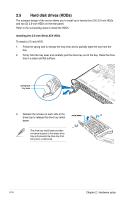
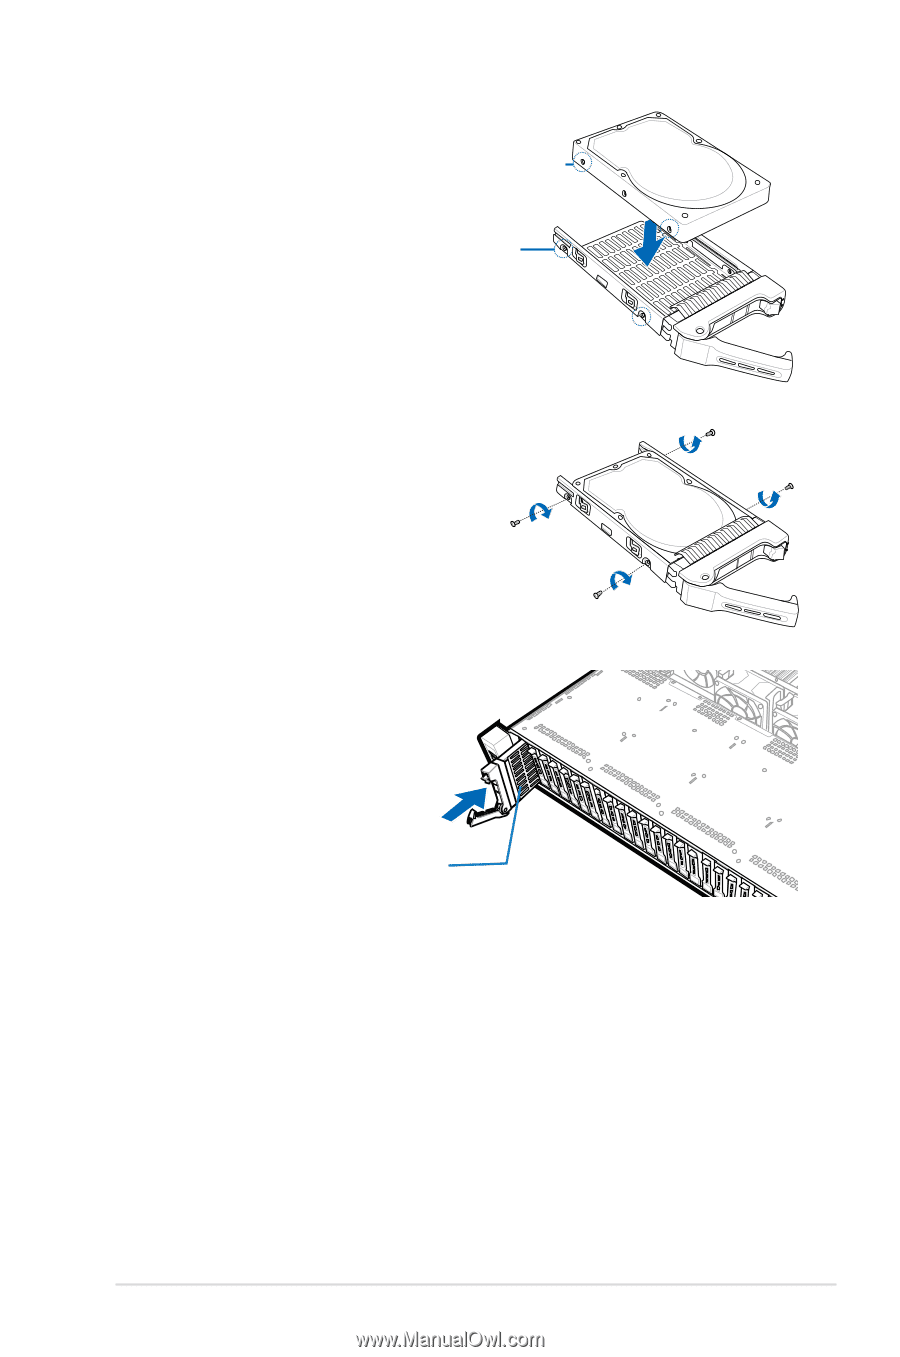
4. Orient and place the Serial ATA HDD/ SAS HDD into the tray. Ensure that the Serial ATA HDD/ SAS HDD is fitted firmly screw hole inside the drive tray and that the four screws of the SSD matches the four screw holes of the drive tray. drive tray screw hole 5. Secure the Serial ATA HDD/ SAS HDD to the drive tray with four bundled screws. 6. Align and insert the 2.5-inch Serial ATA HDD/ SAS HDD and drive tray assembly into the drive bay. 7. Repeat steps 1-6 to install the other 2.5-inch Serial ATA HDD/ SAS HDDs. drive tray and 2.5-inch Serial ATA HDD/SAS HDD assembly ASUS RS720-E7-RS24 Series 2-17
-
 1
1 -
2
-
3
-
4
-
5
-
6
-
7
-
8
-
9
-
10
-
11
-
12
-
13
-
14
-
15
-
16
-
17
-
18
-
19
-
20
-
21
-
22
-
23
-
24
-
25
-
26
-
27
-
28
-
29
-
30
-
31
-
32
-
33
-
 34
34 -
 35
35 -
 36
36 -
 37
37 -
 38
38 -
 39
39 -
 40
40 -
 41
41 -
 42
42 -
 43
43 -
 44
44 -
45
-
46
-
47
-
48
-
49
-
50
-
51
-
52
-
53
-
54
-
55
-
56
-
57
-
58
-
59
-
60
-
61
-
62
-
63
-
64
-
65
-
66
-
67
-
68
-
69
-
70
-
71
-
72
-
73
-
74
-
75
-
76
-
77
-
78
-
79
-
80
-
81
-
82
-
83
-
84
-
85
-
86
-
87
-
88
-
89
-
90
-
91
-
92
-
93
-
94
-
95
-
96
-
97
-
98
-
99
-
100
-
101
-
102
-
103
-
104
-
105
-
106
-
107
-
108
-
109
-
110
-
111
-
112
-
113
-
114
-
115
-
116
-
117
-
118
-
119
-
120
-
121
-
122
-
123
-
124
-
125
-
126
-
127
-
128
-
129
-
130
-
131
-
132
-
133
-
134
-
135
-
136
-
137
-
138
-
139
-
140
-
141
-
142
-
143
-
144
-
145
-
146
-
147
-
148
-
149
-
150
-
151
-
152
-
153
-
154
-
155
-
156
-
157
-
158
-
159
-
160
-
161
-
162
-
163
-
164
-
165
-
166
-
167
-
168
-
169
-
170
-
171
-
172
-
173
-
174
-
175
-
176
-
177
-
178
-
179
-
180
-
181
-
182
-
183
-
184
-
185
-
186
-
187
-
188
-
189
-
190
-
191
-
192
-
193
-
194
-
195
-
196
-
197
-
198
-
199
-
200
-
201
-
202
 |
 |
2-17
ASUS RS720-E7-RS24 Series
4.
Orient and place the Serial ATA HDD/
SAS HDD into the tray. Ensure that the
Serial ATA HDD/ SAS HDD is fitted firmly
inside the drive tray and that the four
screws of the SSD matches the four
screw holes of the drive tray.
drive tray screw hole
screw hole
5.
Secure the Serial ATA HDD/ SAS HDD
to the drive tray with four bundled
screws.
6.
Align and insert the 2.5-inch Serial
ATA HDD/ SAS HDD and drive tray
assembly into the drive bay.
7.
Repeat steps 1—6 to install the other
2.5-inch Serial ATA HDD/ SAS HDDs.
drive tray and 2.5-inch
Serial ATA HDD/SAS HDD assembly