Asus TW100-E5 iQuadro User Manual - Page 100
RAID driver installation
 |
View all Asus TW100-E5 iQuadro manuals
Add to My Manuals
Save this manual to your list of manuals |
Page 100 highlights
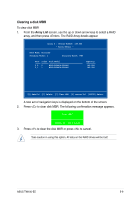
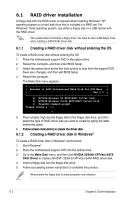
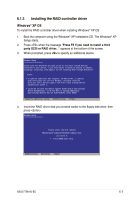
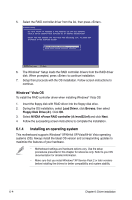
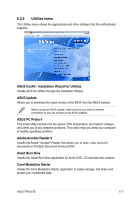
6.1 RAID driver installation A floppy disk with the RAID driver is required when installing Windows® XP operating system on a hard disk drive that is included in a RAID set. For Windows® Vista operating system, use either a floppy disk or a USB device with the RAID driver. The system does not include a floppy drive. You have to use a USB floppy drive when creating a SATA RAID driver disk. 6.1.1 Creating a RAID driver disk without entering the OS To create a RAID driver disk without entering the OS 1. Place the motherboard support DVD in the optical drive. 2. Restart the computer, and then enter BIOS Setup. 3. Select the optical drive as the first boot priority to boot from the support DVD. Save your changes, and then exit BIOS Setup. 4. Restart the computer. The Make Disk menu appears. + Welcome to ASUS Motherboard Make Disk for DOS Menu + + Rev.1.0 + a) NVIDIA Windows XP RAID/AHCI Driver Disk b) NVIDIA Windows Vista RAID/AHCI Driver Disk c) FreeDOS command prompt Please choose a ~ c: _ 5. Place a blank, high-density floppy disk to the floppy disk drive, and then select the type of RAID driver disk you want to create by typing the letter before the option. 6. ���F�o��ll�o�w��s�c�r�e�e��n��in�s�t�r�u�c�t�io��n�s��to��c�r�e�a�t�e��t�h�e��d�r�iv�e��r �d�i�s�k�. 6.1.2 Creating a RAID driver disk in Windows® To create a RAID driver disk in Windows® environment 1. Start Windows®. 2. Place the motherboard support DVD into the optical drive. 3. Go to the Make Disk menu, and then click NVIDIA 32/64bit XP/Vista SATA RAID Driver to create a NVIDIA® 32/64 bit XP/Vista SATA RAID driver disk. 4. Insert a floppy disk into the floppy disk drive. 5. Follow succeeding screen instructions to complete the process. Write-protect the floppy disk to avoid computer virus infection. 6-2 Chapter 6: Driver installation
-
 1
1 -
2
-
3
-
4
-
5
-
6
-
7
-
8
-
9
-
10
-
11
-
12
-
13
-
14
-
15
-
16
-
17
-
18
-
19
-
20
-
21
-
22
-
23
-
24
-
25
-
26
-
27
-
28
-
29
-
30
-
31
-
32
-
33
-
34
-
35
-
36
-
37
-
38
-
39
-
40
-
41
-
42
-
43
-
44
-
45
-
46
-
47
-
48
-
49
-
50
-
51
-
52
-
53
-
54
-
55
-
56
-
57
-
58
-
59
-
60
-
61
-
62
-
63
-
64
-
65
-
66
-
67
-
68
-
69
-
70
-
71
-
72
-
73
-
74
-
75
-
76
-
77
-
78
-
79
-
80
-
81
-
82
-
83
-
84
-
85
-
86
-
87
-
88
-
89
-
90
-
91
-
92
-
93
-
94
-
 95
95 -
 96
96 -
 97
97 -
 98
98 -
 99
99 -
 100
100 -
 101
101 -
 102
102 -
 103
103 -
 104
104 -
 105
105 -
106
-
107
-
108
-
109
-
110
-
111
-
112
-
113
-
114
-
115
-
116
-
117
-
118
-
119
-
120
-
121
-
122
-
123
-
124
-
125
-
126
-
127
-
128
-
129
-
130
-
131
-
132
-
133
-
134
-
135
-
136
 |
 |