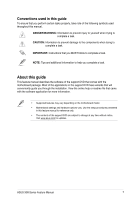
Asus X99-E X99 Series Feature manual.English
Asus X99-E Manual
 |
View all Asus X99-E manuals
Add to My Manuals
Save this manual to your list of manuals |
Asus X99-E manual content summary:
- Asus X99-E | X99 Series Feature manual.English - Page 1
Motherboard X99 II Series Feature Manual - Asus X99-E | X99 Series Feature manual.English - Page 2
://www.asus.com/support/ or code we would be much obliged if you give us a notification to the email address [email protected], stating the product and describing the problem (please DO NOT send large attachments such as source code archives, etc. to this email address). 2 ASUS X99 Series Feature Manual - Asus X99-E | X99 Series Feature manual.English - Page 3
-E CPUs 15 Turbo App...16 Ai Charger+...17 USB 3.1 Boost...18 EZ Update...19 System Information...21 Mobo Connect...23 PC Cleaner...24 USB BIOS Flashback 25 Turbo LAN...27 Aura ...28 HyStream...29 Wi-Fi GO! Card...30 ASUS Wi-Fi GO! card specifications 30 Installation...31 Wi-Fi Engine...32 Wi - Asus X99-E | X99 Series Feature manual.English - Page 4
ASUS Media Streamer 44 System requirements 45 Adding and deleting media files 46 Push Notice...47 Key Express...50 ASUS Disk Unlocker 52 ASUS Boot Setting...53 4 ASUS X99 Series Feature Manual - Asus X99-E | X99 Series Feature manual.English - Page 5
on the motherboard model. • Motherboard settings and hardware options vary. Use the setup procedures presented in this feature manual for reference only. • The contents of the support DVD are subject to change at any time without notice. Visit www.asus.com for updates. ASUS X99 Series Feature - Asus X99-E | X99 Series Feature manual.English - Page 6
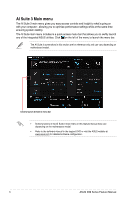
to launch AI Suite 3 menu bar • Some functions in the AI Suite 3 main menu in this feature manual may vary depending on the motherboard model. • Refer to the software manual in the support DVD or visit the ASUS website at www.asus.com for detailed software configuration. 6 ASUS X99 Series Feature - Asus X99-E | X99 Series Feature manual.English - Page 7
3. Click to expand the quick launch area or start quick launch Quick launch area Click to select the available features for AI Suite 3 mini-menu ASUS X99 Series Feature Manual 7 - Asus X99-E | X99 Series Feature manual.English - Page 8
Dual Intelligent Processors 5 ASUS Dual Intelligent Processors 5 combines TPU, EPU, DIGI+ Power Control, Fan Xpert 4, and Turbo Core App functions to push the auto-detect and tune the best settings for your system DO NOT remove your fan during the tuning process. 8 ASUS X99 Series Feature Manual - Asus X99-E | X99 Series Feature manual.English - Page 9
allows you to manually adjust the CPU in the BIOS and are not loaded during system bootup. Save your overclocking settings as a TPU profile and manually load this BIOS to [Auto] before using the CPU Frequency in TPU. Refer to section Ai Tweaker menu in the BIOS chapter of your motherboard user manual - Asus X99-E | X99 Series Feature manual.English - Page 10
OS information of your computer. However, the true CPU frequency varies depending on the wattage that you manually set. You can adjust the CPU wattage from the lowest base on your preferred default value. • your system to its default settings, reboot your computer. 10 ASUS X99 Series Feature Manual - Asus X99-E | X99 Series Feature manual.English - Page 11
performance. The following screens are for reference only. Configuration options varies depending on the motherboard model. Adjusting the CPU Power Click to switch between screens Click to undo the VRM phase and the thermal conditions of every phase component. ASUS X99 Series Feature Manual 11 - Asus X99-E | X99 Series Feature manual.English - Page 12
ASUS optimized phase tuning profile to increase the DRAM power efficiency. • The actual performance boost may vary depending on your CPU specification. • Ensure that the cooling modules are properly installed in your motherboard to monitor the thermal conditions. 12 ASUS X99 Series Feature Manual - Asus X99-E | X99 Series Feature manual.English - Page 13
CPU and chassis fans to achieve their best cooling performance. ASUS Fan Xpert 4 also supports hardware level PWM/DC combo mode for the CPU, chassis Click and drag to set the fan's rotation speed Click to enable Extreme Quiet Click and drag the sliders to adjust the fan's responsiveness Click - Asus X99-E | X99 Series Feature manual.English - Page 14
fan is installed with an external control kit for rotation speed. • Fan Xpert 4 does not support 2-pin fans. If you install a 2-pin fan, it can only run at its full changes The water pump header does not support the Fan Tuning function to prevent the water pump from not working due to - Asus X99-E | X99 Series Feature manual.English - Page 15
running applications on your system Displays the applications added to the Turbo Core App List Click to undo the changes Click to apply the changes ASUS X99 Series Feature Manual 15 - Asus X99-E | X99 Series Feature manual.English - Page 16
running Displays the applications applications on your system added to the Turbo App List Click to undo the changes Click to apply the changes 16 ASUS X99 Series Feature Manual - Asus X99-E | X99 Series Feature manual.English - Page 17
AI Suite 3 main menu, then select Ai Charger+. Ai Charger+ is available on selected motherboard models. Ai Charger+ screen Tick to enable or disable Ai Charger+ Click to apply • Ai Charger+ does not support USB hubs, USB extension cables, and generic USB cables. ASUS X99 Series Feature Manual 17 - Asus X99-E | X99 Series Feature manual.English - Page 18
section of your motherboard's user guide for more details. • USB 3.1 Boost automatically detects the USB 3.1/3.0 devices that support UASP. • The data transfer speed varies with USB devices. For a higher data transfer performance, use a USB 3.1/3.0 device. 18 ASUS X99 Series Feature Manual - Asus X99-E | X99 Series Feature manual.English - Page 19
EZ Update. Using EZ Update Click to automatically update your motherboard driver, software and firmware X99-DELUXE II X99-DELUXE_II-ASUS-0001.CAP X99-DELUXE II Click to search and select the BIOS file Click to select a boot logo Click to update the BIOS ASUS X99 Series Feature Manual 19 - Asus X99-E | X99 Series Feature manual.English - Page 20
logo X99-DELUXE II X99-DELUXE_II-ASUS-0001.CAP X99-DELUXE II Click to go back to EZ Update main screen Click to proceed the updating BIOS and boot logo After you Click BIOS Update button, Click Flash to update the BIOS and upload the boot logo in your system. 20 ASUS X99 Series Feature Manual - Asus X99-E | X99 Series Feature manual.English - Page 21
on the left of the AI Suite 3 main menu, then select System Information. Viewing the motherboard information Click the MB tab to view the motherboard's information. X99-DELUXE II Viewing the CPU information Click the CPU tab to view the processor's information. ASUS X99 Series Feature Manual 21 - Asus X99-E | X99 Series Feature manual.English - Page 22
Viewing the SPD information Click the SPD tab to view the memory's information. 22 ASUS X99 Series Feature Manual - Asus X99-E | X99 Series Feature manual.English - Page 23
Set Hotkey for Audio Mode Select device for Keyboard/Mouse sharing Select device for audio Audio Mode Click to apply the settings • This feature only supports Android devices. • Audio mode supports audio playback from your smart device to the PC. ASUS X99 Series Feature Manual 23 - Asus X99-E | X99 Series Feature manual.English - Page 24
the scan status and clean results Check and select the items to clear Click to stop cleaning Click to start cleaning process checked items 24 ASUS X99 Series Feature Manual - Asus X99-E | X99 Series Feature manual.English - Page 25
the AI Suite 3 main menu, then select USB BIOS Flashback. USB BIOS Flashback is available only in selected motherboard models. Using USB BIOS Flashback Set a schedule for the BIOS Update download X99-DELUXE II Click to check for a new BIOS update available for download Click to cancel the download - Asus X99-E | X99 Series Feature manual.English - Page 26
storage device to your computer's USB port that supports USB BIOS Flashback. Refer to section Rear I/O connection of your motherboard's user manual for more details. To download the updated BIOS: 1. From the USB BIOS Flashback screen, Click Check for New BIOS Update. Wait for the system to check the - Asus X99-E | X99 Series Feature manual.English - Page 27
Media Streaming, Games and File Sharing) facilitating different user scenarios. Users can also manually allocate bandwidth and adjust priority settings of each application to run faster and smoother Applications that are using the network Set application priority ASUS X99 Series Feature Manual 27 - Asus X99-E | X99 Series Feature manual.English - Page 28
LED light direction Select the RGB LED light speed A header calibration pop-up window will appear when you select a header for the first time. 28 ASUS X99 Series Feature Manual - Asus X99-E | X99 Series Feature manual.English - Page 29
devices ON or OFF • This feature may not be compatible on some smart devices. • Use AirPlay to stream photos and audio files from iOS devices. ASUS X99 Series Feature Manual 29 - Asus X99-E | X99 Series Feature manual.English - Page 30
Motherboard rear and audio connections of your motherboard's user guide. The Wi-Fi standard of 802.11ac will be restricted by countries' regulations. Wi-Fi 802.11ac feature will be supported under the complete 11ac eco-system environment. ASUS on the next page) 30 ASUS X99 Series Feature Manual - Asus X99-E | X99 Series Feature manual.English - Page 31
the Wi-Fi GO! card driver 4. ASUS AI Suite 3 utility • Ensure to install the bundled Wi-Fi antenna connector to the Wi-Fi GO! card ports. • To install ASUS AI Suite 3 utility, place the support DVD into the optical drive and follow the onscreen instructions. ASUS X99 Series Feature Manual 31 - Asus X99-E | X99 Series Feature manual.English - Page 32
updates. To install Wi-Fi GO! card driver: 1. Place the support DVD into the optical drive. If Autorun is enabled in your computer, the DVD automatically displays the installation wizard. 2. Click the Driver tab then click ASUS Bluetooth 4.0 Wi-Fi Driver. 3. Follow the onscreen instructions - Asus X99-E | X99 Series Feature manual.English - Page 33
a network adapter. 3. From the list of available networks, select a network that you want to connect to. Some networks may require you to key in a password. ASUS X99 Series Feature Manual 33 - Asus X99-E | X99 Series Feature manual.English - Page 34
confirmation Click to disable AP mode Click to enable AP mode • ASUS WiFi Engine supports Windows® 7 (32-bit & 64-bit) and Windows® AP mode, the Internet Connection Sharing may depend on the Bluetooth/Internet device's driver support. • Due to Windows® 8 limitations, it may take several minutes to - Asus X99-E | X99 Series Feature manual.English - Page 35
Play. For iOS devices, download it from App Store. • Install the Wi-Fi GO! card driver and ASUS HomeCloud utility from the support DVD bundled with your ASUS motherboard or visit www.asus.com. • Ensure to reinstall the Wi-Fi GO! card driver to fully utilize the Wi-Fi GO! functions. Smart device - Asus X99-E | X99 Series Feature manual.English - Page 36
device. The browser will direct you to the ASUS website (www.asus.com). 2. From the ASUS website, click Sign Up then follow onscreen instructions to complete the registration. Logging in To log window, key in your ASUS account and password (A) then click Login (B). 36 ASUS X99 Series Feature Manual - Asus X99-E | X99 Series Feature manual.English - Page 37
bar. Click to set a password or log in using your ASUS Account Wi-Fi GO! menu Use your smart device to scan QR Codes for more information To protect your Wi-Fi utility from unauthorized remote section Wi-Fi GO! & NFC Remote of this user manual for more details. ASUS X99 Series Feature Manual 37 - Asus X99-E | X99 Series Feature manual.English - Page 38
the same Wi-Fi network as your computer or log in on your computer and smart devices using the same ASUS account to fully utilize the Wi-Fi GO! functions across different networks. 2. On your smart device, tap reference only and vary with the type of smart device. 38 ASUS X99 Series Feature Manual - Asus X99-E | X99 Series Feature manual.English - Page 39
's Wake-on-LAN settings. To configure your computer's Wake-on-LAN settings: 1. From BIOS Setup, go to Advanced > APM Configuration then set Power On By PCI-E/PCI to [ function will be supported in the later version for Windows® 8 and Windows® 10 operating system. ASUS X99 Series Feature Manual 39 - Asus X99-E | X99 Series Feature manual.English - Page 40
Cloud GO! Cloud GO! allows you to control and synchronize your files across multiple cloud services such as ASUS WebStorage, Dropbox®, Google Drive™, and OneDrive®. • Ensure to set the correct system date back to Wi-Fi GO!/Remote GO! screen Tick to select contents 40 ASUS X99 Series Feature Manual - Asus X99-E | X99 Series Feature manual.English - Page 41
the Charms bar Tap to launch the smart device's keypad. Tap to launch Settings Remote Desktop function keys • Microsoft multitouch functions are supported on Windows® 8 / 8.1 / 10. • The Extended Mode support varies with the VGA driver installed in your computer. ASUS X99 Series Feature Manual 41 - Asus X99-E | X99 Series Feature manual.English - Page 42
authorization to the selected device. This function requires the Push Notice feature to be installed. You can get the PUSH Notice installer from the bundled support DVD or download the latest installer from www.asus.com. 42 ASUS X99 Series Feature Manual - Asus X99-E | X99 Series Feature manual.English - Page 43
your computer, then tap Send. • The files you transferred can be found on the location X:\Users\Documents\ASUS HomeCloud\Wi-Fi GO!\File Transfer\ • To select a new storage location, click Setting. Another way to app to start sending the file to the computer. ASUS X99 Series Feature Manual 43 - Asus X99-E | X99 Series Feature manual.English - Page 44
Visit www.asus.com for more information about NFC EXPRESS 2. • The public-to-private network functions for the iOS system will be available from Media Streamer V2.00.00 or later versions. • The iOS system only support photo and video streaming for Media Streamer. 44 ASUS X99 Series Feature Manual - Asus X99-E | X99 Series Feature manual.English - Page 45
10 ASUS HomeCloud Smart device Android 4.0 or higher versions iOS7 or later versions ASUS Media Streamer To use ASUS Media Streamer: On your computer, click ASUS HomeCloud media files Click to select media type Log in ASUS account to stream Click a media file to play play in different networks Select the - Asus X99-E | X99 Series Feature manual.English - Page 46
Click to delete selected files Click to proceed with the deletion or addition of files Click to cancel changes The following media formats are supported by Android and iOS devices: • Android: .3gp, .mp4, .m4a, .aac, .ts, .flac, .mp3, .mid, .xmf, .mxmf, .rtttl, .rtx, .ota, .imy, .ogg, .mkv, .wav - Asus X99-E | X99 Series Feature manual.English - Page 47
your computer that you want to pair with. To pair your computer and smart device, ensure that both are connected to the same wireless network. ASUS X99 Series Feature Manual 47 - Asus X99-E | X99 Series Feature manual.English - Page 48
to your smart device Tick to select the smart device Tick to send alert when the components selected are back to its normal status 48 ASUS X99 Series Feature Manual - Asus X99-E | X99 Series Feature manual.English - Page 49
PC sent messages Tap to scan more host computers Tick to select the smart device Click to send your message Tap to delete PC alerts ASUS X99 Series Feature Manual 49 - Asus X99-E | X99 Series Feature manual.English - Page 50
Shortcut settings. Windows Login Select Windows account order and enter your password • This function is meant for convenience, not for security. • This function is not supported at the account switch screen. 50 ASUS X99 Series Feature Manual - Asus X99-E | X99 Series Feature manual.English - Page 51
activate your PC by using the hotkeys in S5 mode. • The and key on the numeric keypad cannot be utilized under S5 mode. ASUS X99 Series Feature Manual 51 - Asus X99-E | X99 Series Feature manual.English - Page 52
in hard disk drives (HDD). ASUS Disk Unlocker is supported only on Windows® 7 and Windows® 8. To launch ASUS Disk Unlocker, click . Click to open the help file that shows the detailed information on how to use ASUS Disk Unlocker ASUS Disk Unlocker Help file 52 ASUS X99 Series Feature Manual - Asus X99-E | X99 Series Feature manual.English - Page 53
system bootup process using Normal Boot or Fast Boot. To fully support ASUS Boot Setting on your motherboard, download the latest BIOS from ASUS Support site at http://www.asus.com and update the BIOS to your system. Click to enter BIOS Setup directly Click to show Advanced Setup settings Click to - Asus X99-E | X99 Series Feature manual.English - Page 54
the boot setup settings. 2. In Next boot after AC power loss, click Normal Boot. 3. On the confirmation message, click Yes to apply this setting. 54 ASUS X99 Series Feature Manual
-
 1
1 -
 2
2 -
 3
3 -
 4
4 -
 5
5 -
 6
6 -
 7
7 -
8
-
9
-
10
-
11
-
12
-
13
-
14
-
15
-
16
-
17
-
18
-
19
-
20
-
21
-
22
-
23
-
24
-
25
-
26
-
27
-
28
-
29
-
30
-
31
-
32
-
33
-
34
-
35
-
36
-
37
-
38
-
39
-
40
-
41
-
42
-
43
-
44
-
45
-
46
-
47
-
48
-
49
-
50
-
51
-
52
-
53
-
54
 |
 |

Motherboard
X99 II Series
Feature Manual