Audiovox XMCK20P User Guide - Page 20
Step 4: Making Your Vehicle's FM Radio an XM Radio
 |
UPC - 044476043123
View all Audiovox XMCK20P manuals
Add to My Manuals
Save this manual to your list of manuals |
Page 20 highlights
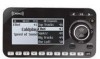
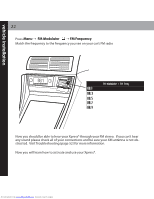
vehicle installation 20 Now that your XpressR is all set up, it is time to power it up. If you are using the XM SureConnect you will need to read Step 4. If you are using the cassette adapter you are all finished and ready to move on to activation on page 24. Step 4: Making Your Vehicle's FM Radio an XM Radio Your XpressR contains a built-in FM modulator that requires the use of either the XM SureConnect (sold separately) or the FM Direct Adapter (sold separately) to transmit the XM audio signal to your vehicle's FM radio. The factory default setting for your XpressR is FM Modulator (Off). Follow the menu instructions to change the menu setting to FM Modulator (On). Turn on your car stereo. You will need to find a suitable FM frequency in order to get the best sound. A suitable FM frequency is an unused frequency or weak station that is not located near a strong FM station in your area. Follow the steps below for more help: 1. Go to www.xmradio.com/fmlocator for recommended FM frequencies in your area. 2. Enter your local USPS Zip Code. 3. You will see the recommended FM frequencies in your area. Try the "vacant" chan- nels first. 4. Set your vehicle's FM radio to one of the recommended frequencies. Now set your XM receiver to the same frequency using the menu settings. For more information, see FM Frequency on page 47. 5. If the audio quality is not satisfactory, you can repeat these steps by choosing another frequency. Downloaded from www.Manualslib.com manuals search engine
-
 1
1 -
2
-
3
-
4
-
5
-
6
-
7
-
8
-
9
-
10
-
11
-
12
-
13
-
14
-
 15
15 -
 16
16 -
 17
17 -
 18
18 -
 19
19 -
 20
20 -
 21
21 -
 22
22 -
 23
23 -
 24
24 -
 25
25 -
26
-
27
-
28
-
29
-
30
-
31
-
32
-
33
-
34
-
35
-
36
-
37
-
38
-
39
-
40
-
41
-
42
-
43
-
44
-
45
-
46
-
47
-
48
-
49
-
50
-
51
-
52
-
53
-
54
-
55
-
56
-
57
-
58
-
59
-
60
-
61
-
62
 |
 |