Behringer MON800 Manual - Page 6
Control Elements and Connections
 |
View all Behringer MON800 manuals
Add to My Manuals
Save this manual to your list of manuals |
Page 6 highlights
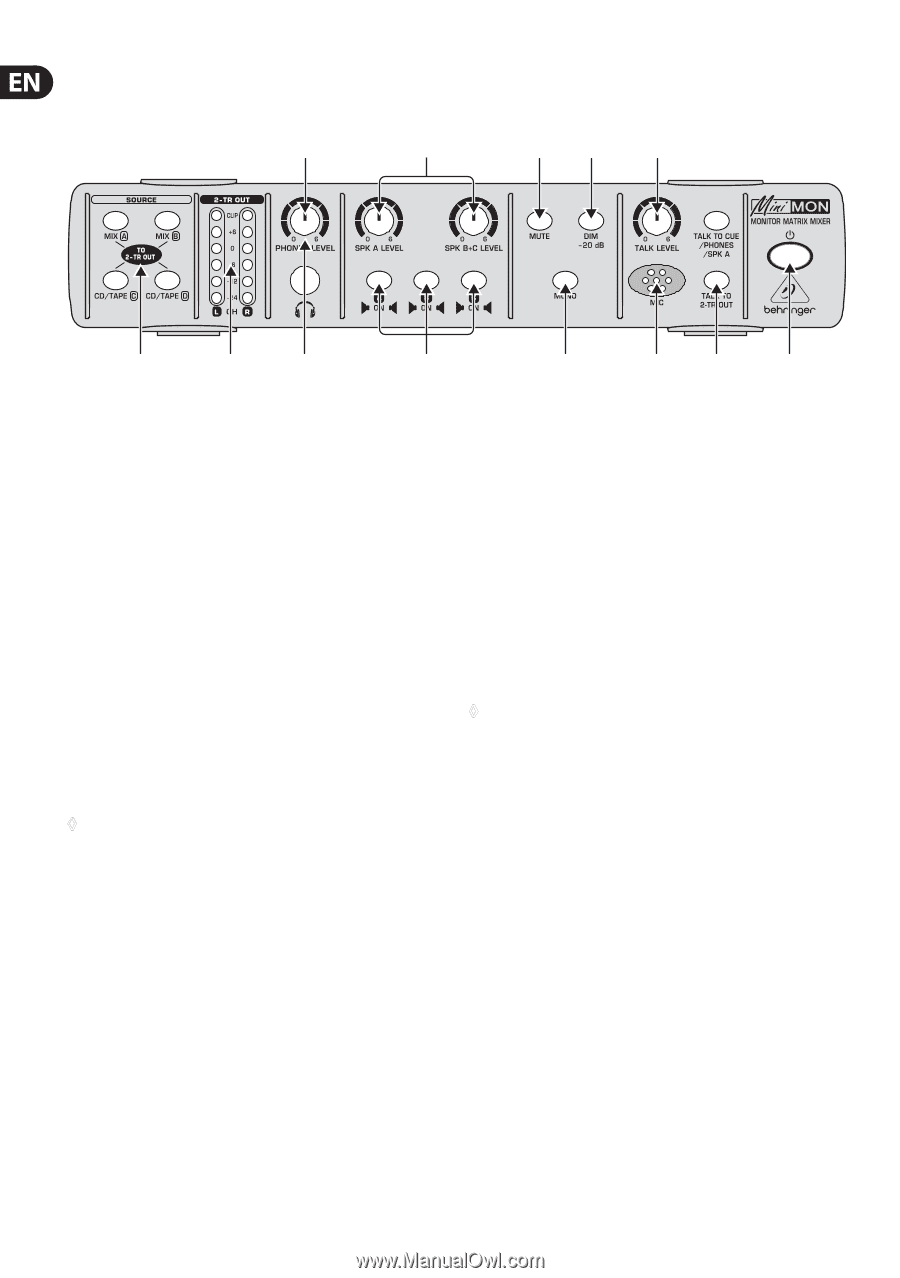
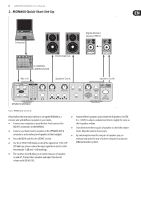
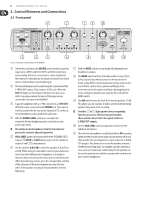
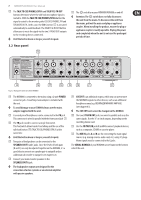
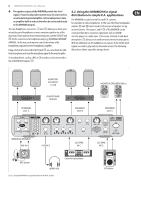
6 MINIMON MON800 User Manual 3. Control Elements and Connections 3.1 Front panel (4) (5) (7) (9) (10) (1) (2) (3) (6) Fig. 3.1: Front panel control elements of the MON800 (1) Use the four switches in the SOURCE section to select up to four input sources (MIX A and B, CD/TAPE C and D) for monitoring and recording. If desired, several sources can be activated at the same time. Subsequently, the signals are mixed. Each active source is indicated by its switch lighting up. (2) The two LED displays are for monitoring the output level of the 2-TRACK OUT outputs. They comprise 6 LEDs each. When the CLIP LED lights up, this indicates that distortion may occur. In this case, please reduce the levels of the signal sources connected to the input of the MON800. (3) A pair of headphones with a 1/4" TRS connector (e.g. BEHRINGER HPS5000) can be connected to the PHONES jack. This output is wired in parallel with the rear-panel output jack (15), so that up to two headphones can be used at the same time. (4) With the PHONES LEVEL control you can adjust the volume for the two headphones jacks on the front or rear panel respectively. ◊ The volume on the headphones from the front and rear panel jacks cannot be adjusted separately. (5) SPK A LEVEL governs the volume level of the SPEAKERS OUT A outputs (18). SPK B + C LEVEL allows you to set the volume for outputs B and C (17) simultaneously. (6) Use the switches A/B/C ON to switch the speakers A, B and C on and off. While mixing it is advisable to listen to your production over at least two different pairs of speakers, so as to get an objective impression of your mix. If you wish to switch between different monitoring systems, press the corresponding switches of the active and of the inactive speaker pair one after the other. Active speakers are always indicated by their switches lighting up. (8) (11) (12) (13) (7) With the MUTE switch you can disable all loudspeaker and headphones outputs. (8) The MONO switch switches all monitor paths to mono. This is useful, in particular, when you want to check your mix for mono compatibility. Extreme panorama settings and excessive use of effects, such as chorus, phaser and flanger in the stereo mix can lead to signal cancellations during playback in mono. Such phase problems can easily be detected with the MONO switch. (9) The DIM switch lowers the level of the monitor paths by -20 dB. This allows you, for example, to talk to somebody while mixing without losing track of the recording. ◊ Switches (7) to (9) light up when the corresponding functions are active. The functions performed by these switches do not affect the signals of the two 2-TRACK OUT outputs. (10) Use the TALK LEVEL control to adjust the sensitivity of the talk-back microphone. (11) The talk-back microphone is installed behind the MIC openings. Speak into the microphone to make announcements which are then routed to the recording devices connected to the 2-TRACK OUT outputs. This allows you to record the numbers or names of different recording takes, for example, and thus maintain a clear overview of your work. Additionally, the microphone can be used to communicate with the musicians who can hear your voice on their headphones.
-
 1
1 -
 2
2 -
 3
3 -
 4
4 -
 5
5 -
 6
6 -
 7
7 -
 8
8 -
 9
9 -
 10
10 -
 11
11 -
 12
12 -
13
-
14
 |
 |