Behringer MOTOR 49 Quick Start Guide - Page 6
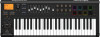
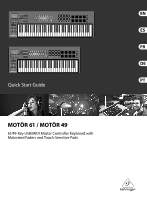
MOTÖR 61 / MOTÖR 49 Controls - midi keyboard
 |
View all Behringer MOTOR 49 manuals
Add to My Manuals
Save this manual to your list of manuals |
Page 6 highlights
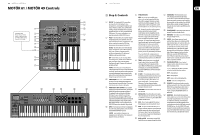
10 MOTÖR 61 / MOTÖR 49 MOTÖR 61 / MOTÖR 49 Controls (12) (13) (1) (14) Important Note: (2) Please refer to the MC (15) Mode Assignment table (4) on page 30 when using the unit in MC Mode (3) (16) (5) (7) (8) (6) (9) (10) (11) (17) (18) (19) (20) (21) 11 Quick Start Guide (EN) Step 2: Controls (1) DISPLAY - this large backlit LCD screen allows you to quickly check the keyboard status, edit parameters, and navigate through four main menus: PRESETS, GLOBAL, EDIT, and PROGRAM (6) OPERATION MODE MIDI - this puts the unit into MIDI mode, where it can send and respond to MIDI data. When MIDI is engaged, this button will light, and MC mode will be disengaged. (This is the standard mode, where all assignments can be done freely by the user and stored into presets.) (14) FADER BANKS - these buttons allow you to select the group of 8 faders through 4 banks, so each fader can represent 8 different parameters (4 touch and 4 move commands). It does not affect the master fader, as it has no banks. Note: All BANK buttons (faders, encoders, and pads) change only the bank, they do not send out any MIDI data when in MIDI mode. CHANGE. Navigate the display menus by turning the DATA knob (press to select) and the BACK and FWD buttons. The contrast and brightness are MC - this puts the encoders, faders, transport buttons and both foot controls into MC mode (Mackie Control-compatible protocol), (15) ENCODER BANKS - these allow you to select the group of 8 encoders through 4 banks. adjustable using the GLOBAL/DEVICE menu. where they send out and respond to MC data. (16) PAD BANKS - these allow you to select the group (2) PRESET - this menu allows you to quickly navigate through the current presets and easily select one with the DATA push encoder. For editing (save, copy, delete, rename) please go to the EDIT menu, where you can also see a preset overview list. GLOBAL - this menu allows you to view and adjust features and properties such as: MIDI assignments, Pads, Faders, Encoders, Keyboard properties, and Device settings such as LCD contrast and brightness, and many other features. When MC is engaged, this button will light. of 8 pads through 4 banks. Please note that this mode offers a hybrid operation - MC control for the panel controls (apart from the pads), and in parallel standard MIDI operation for the keys, pads and both wheels. For this reason it is not necessary to toggle between MIDI and MC operation mode. If your software supports the Mackie Control protocol, you can stay permanently in MC mode. (17) FADERS - these 60 mm, motorized, touchsensitive faders, allow you to control your DAW mixer, drawbar organ, soft synths or effect units. In MIDI mode the faders can send and receive CC commands for movement, and CC or Note command for touch. In MC mode they follow the protocol of your DAW software. 4 different banks (fader assignments) can be selected in Please note that for MC communication, it is MIDI mode, using the FADER BANK buttons. required to assign the second indicated MIDI port Fader 9 (Master) is generally used as a master EDIT - in this menu, you can save, copy, delete to the Mackie Control Surface in your MIDI DAW. volume control. It operates the same as the other and rename presets, and edit various additional items and features such as the Arpeggiator, Note Repeat (for pads), Transpose (for keyboard), and Keyboard Split. (7) TEMPO - tap this button twice at your desired faders, except it has no banks. tempo to adjust the beats per minute (BPM). (18) TRANSPORT BUTTONS - these standard The button will flash on the downbeat of the transport controls allow direct access to your current BPM. If the PRESET menu is currently shown DAW record/play controls. P CHNG - in this menu, you can set up the pads to in the display, you can also adjust the BPM by send program change messages to attached hardware pressing the TEMPO button and then turning the or software. There are two menus, the first where you DATA knob. can assign fixed program change commands to the pads, and the second menu where a single program change message can be sent instantly. (8) OCTAVE ± - these allow you to raise or lower the keyboard's pitch range in steps of an octave. Pressing both buttons together will reset to (3) TIME DIVISION these buttons move Octave 0 (no transpose). These buttons can the value of the note repeat and arpeggio time also be used for data ± entering in various > - shuttles the song back or forward, or skip back and forth between markers. STOP - stops playback. PLAY - starts playback. LOOP - loops a selection during playback. RECORD - arms the recording function. division between the available values. The current Edit menus. To allow a firmware update, (19) ENCODERS - these detented endless encoders time division value is shown in the display. press and hold down both Octave buttons while each have a ring of 13 LEDs. They send out either (4) FADER TOUCH - SHIFT and FOCUS - these 2 buttons modify the"touch"function of the faders. Pressing and holding SHIFT provides an alternate set of Note or CC commands for the touch function of the faders. FOCUS does the same, without the need to hold down the button; you can toggle on/off this second assignment mode with the FOCUS button. The alternate command for each fader is setup using the GLOBAL/ MIDI/CHANGE CONTROL menu, by holding down the FADER SHIFT button when setting the Change Control. turning on the power switch. (9) PITCH BEND - this wheel allows you to lower or raise the pitch. (10) MODULATION - this wheel allows you to apply vibrato (modulation). This wheel can be assigned to a different CC number using the GLOBAL/MIDI/ CHANGE CONTROL menu. (11) KEYS - 49 or 61 semi-weighted full-size keys featuring expressive velocity and after-touch. MIDI or MC data depending on which mode is selected, and they can be switched between 4 banks using the ENCODER BANK buttons in MIDI mode. (20) DRUM PADS - these 8 backlit drum pads have velocity and pressure-sensitivity for ultimate drum and sample-loop performance. They can send CC or MIDI note commands, and continuouslyvariable aftertouch. The pad assignment can be switched between 4 banks in MIDI mode, using the (5) ARPEG - this button turns the built-in arpeggiator on or off. Various playing modes can be selected in the EDIT/ARPEGGIATOR/STYLE menu. A LATCH - when activated, it generates an arpeggio based on latched keys, that continues to play after the keys are released. (12) DATA - this push-encoder knob allows you to navigate within the display by scrolling through available menus and values; pushing it selects the menu or value. If you turn the knob faster, the value will also change faster (depending on the selected parameter). (13) BACK and FWD - these buttons and the DATA PAD BANK buttons. Use the GLOBAL/PADS menu to adjust the velocity and aftertouch assignments, and use the GLOBAL/PADS/COLOR menu, to choose from 16 backlit colors, individually for each pad. knob, allow you to navigate through the display.
-
 1
1 -
 2
2 -
 3
3 -
 4
4 -
 5
5 -
 6
6 -
 7
7 -
 8
8 -
 9
9 -
 10
10 -
 11
11 -
 12
12 -
13
-
14
-
15
-
16
-
17
-
18
 |
 |
