Behringer X18 Quick Start Guide - Page 12
Step 3: Network, Connection - firmware
 |
View all Behringer X18 manuals
Add to My Manuals
Save this manual to your list of manuals |
Page 12 highlights
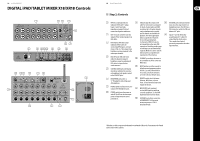
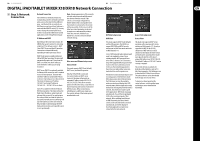
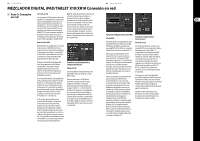
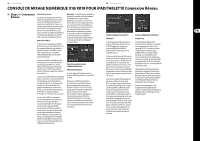
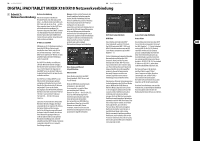
22 X AIR X18/XR18 23 Quick Start Guide DIGITAL iPAD/TABLET MIXER X18/XR18 Network Connection (EN) Step 3: Network Connection Getting Started First Wifi remote connection to your X AIR mixer 1. Download and install the remote control app for your device. • Android smartphones/tablets: X AIR Android from the Google Play* store • Apple iPad: X AIR for iPad from the Apple* App store • PC: X AIR EDIT for Windows, Mac or Linux from behringer.com 2. Set the REMOTE switch on your X AIR mixer to ACCESS POINT mode and power on the mixer. 3. Reset your X AIR mixer's network settings to default values by holding the RESET button for 2 seconds. This is located in the small hole above the Wifi icon and requires a paper clip or similar tool to reach. 4. Switch your remote control device on and open the network settings. Android smartphones/tablets: 1. Start the Settings/Wireless & Networks dialog on your Android system. 2. Switch 'Wifi' on. 3. Click on 'Wifi' to select a network. From the list of networks, select your X AIR mixer's name, e.g. "XR1819-1B-07". After a few seconds, the status should change to 'Connected'. 4. Open your X AIR for Android app and it will show similar information: • Mix Access = All • IP Address = 192.168.1.1 • Wifi Lock = None • Wifi connected to XR18-19-1B-07 5. You may choose to lock the connection to this specific Wifi network if you want to ensure that your device cannot automatically connect to another network while you are controlling your mixer. 6. Click on 'Connect' and tap on the mixer's name in order to connect the app with your mixer. Note - if a warning pops up telling you that the mixer firmware is not supported, it is recommended to update the firmware to the latest version (see the X18 pages on behringer.com for details). You can, however, choose to connect anyway. 7. Once the app is connected to your mixer, all parameters will be loaded automatically. Enjoy exploring all mixing functions of your X AIR mixer remotely! Apple iPad: 1. Start the Settings/Wifi dialog on your iOS. 2. Switch 'Wifi' on. 3. Select your X AIR mixer's name from the list of networks, e.g. "XR18-19-1B-07". After a couple of seconds, the status should change to 'Connected', indicated by a check mark. 4. Open your X AIR for iPad app and it will show any X AIR mixers ('Devices') found in that network, with their IP address, which in this case is 192.168.1.1. 5. Tap on the mixer's icon to connect the app with your mixer. Note - if a warning pops up telling you that the mixer firmware is not supported, it is recommended to update the firmware to the latest version (see the X18 pages on behringer.com for details). You can, however, choose to connect anyway. 6. Once the app is connected to your mixer, all parameters will be loaded automatically. Enjoy exploring all mixing functions of your X AIR mixer remotely! PC: X AIR EDIT for Windows, Mac or Linux 1. Open the Wireless Network Connections dialog on your operating system. 2. Make sure the 'WLAN' or 'Wifi' adapter is switched on. 3. View the list of wireless networks and select your X AIR mixer's name, e.g. "XR18-19-1B-07". After a couple of seconds, the status should change to 'Connected', indicated by a check mark. 4. Open your X AIR Editor for Win/Mac/ Linux and click on 'Setup'. The list will show any X AIR mixers found in that network, with their name and IP address, which in this case is 192.168.1.1. 5. Click on your mixer's name, e.g. "XR18-19-1B-07", and confirm to synchronize from mixer to PC in order to connect the app with your mixer. If a warning pops up telling you that the mixer firmware is not supported, it is recommended to update the firmware to the latest version (see the X18 pages on behringer.com for details). You can, however, choose to connect anyway. 6. Once the app is connected to your mixer, all parameters will be transferred automatically. Enjoy exploring all mixing functions of your X AIR mixer remotely!
-
 1
1 -
2
-
3
-
4
-
5
-
6
-
 7
7 -
 8
8 -
 9
9 -
 10
10 -
 11
11 -
 12
12 -
 13
13 -
 14
14 -
 15
15 -
 16
16 -
 17
17 -
18
-
19
-
20
-
21
-
22
-
23
-
24
-
25
 |
 |