Beko CEP5152 Owners Manual - Page 12
Operation and use
 |
View all Beko CEP5152 manuals
Add to My Manuals
Save this manual to your list of manuals |
Page 12 highlights
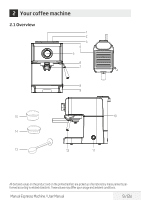
4 Operation and use 4.1 Before First Use After carefully unpacking your espresso machine, wash all removable parts with warm soapy water and rinse thoroughly. Familiarize yourself with the appliance and read the instruction manual. Plug the power cord into a grounded wall outlet according to the safety instructions. Turn the machine on by pressing the Power Button (11) on the side of the appliance. The Power Button will light solid blue while the indicator light on the Control Knob (5) will start to blink, indicating the machine is heating up. Rinse the internal components before making espresso. Fill the water tank and pump a few ounces of water through the brew head (6) and the frothing wand (10). Follow the procedure in chapter 4 for "Warming Internal Components & Cups" to rinse the machine before first use. 4.2 Filling the Water Tank Remove the water tank (3) by lifting up on the handle (2). Open the lid (1) and fill the water tank with fresh cold water between the MIN and MAX markings. Close the lid (1) and replace the water tank by pushing down firmly, to ensure the tank is properly engaged. 4.3.2 The Control Knob The Control Knob (5) has three positions: Position Symbol Explanation Left brewing coffee Middle Right standby, cup warming, preparedness steam production through the frothing spout C During brewing or steaming, the indicator light inside the Control Knob (5) may start to blink or change color, specifying the heating system is on, maintaining the proper temperature for brewing or steaming. C Always turn the Control Knob (5) to the " " position before turning off the machine. 4.3 Control Panel 4.3.1 The Power Button The Power Button (11) on the side of the machine turns the machine on and off. When the machine is turned on, the indicator light on the Control Knob (5) will start to blink red, signifying that the machine is warming up the heating system. The initial heat-up time is under one minute at normal room temperature. When the indicator light illuminates solid blue, the internal components are heated and ready to brew coffee. To turn the machine off, ensure the Control Knob is in the " " position and press the Power Button on the side of the machine to turn it off. 12 / EN Manual Espresso Machine / User Manual
-
 1
1 -
2
-
3
-
4
-
5
-
6
-
 7
7 -
 8
8 -
 9
9 -
 10
10 -
 11
11 -
 12
12 -
 13
13 -
 14
14 -
 15
15 -
 16
16 -
 17
17 -
18
-
19
-
20
-
21
-
22
-
23
-
24
-
25
-
26
-
27
-
28
-
29
-
30
-
31
-
32
-
33
-
34
-
35
-
36
-
37
-
38
-
39
-
40
-
41
-
42
-
43
-
44
-
45
-
46
-
47
-
48
-
49
-
50
-
51
-
52
-
53
-
54
-
55
-
56
-
57
-
58
-
59
-
60
-
61
-
62
-
63
-
64
-
65
-
66
-
67
-
68
-
69
-
70
-
71
-
72
-
73
-
74
-
75
-
76
-
77
-
78
-
79
-
80
-
81
-
82
-
83
-
84
-
85
-
86
-
87
-
88
-
89
-
90
-
91
-
92
-
93
-
94
-
95
-
96
-
97
-
98
-
99
-
100
-
101
-
102
-
103
-
104
-
105
-
106
-
107
-
108
-
109
-
110
-
111
-
112
-
113
-
114
-
115
-
116
-
117
-
118
-
119
-
120
-
121
-
122
-
123
-
124
-
125
-
126
-
127
-
128
-
129
-
130
-
131
-
132
-
133
-
134
-
135
-
136
-
137
-
138
-
139
-
140
-
141
-
142
-
143
-
144
-
145
-
146
-
147
-
148
-
149
-
150
-
151
-
152
-
153
-
154
-
155
-
156
-
157
-
158
-
159
-
160
-
161
-
162
-
163
-
164
-
165
-
166
-
167
-
168
-
169
-
170
-
171
-
172
-
173
-
174
-
175
-
176
-
177
-
178
-
179
-
180
-
181
-
182
-
183
-
184
-
185
-
186
-
187
-
188
-
189
-
190
-
191
-
192
-
193
-
194
-
195
-
196
-
197
-
198
-
199
-
200
-
201
-
202
-
203
-
204
-
205
-
206
-
207
-
208
-
209
-
210
-
211
-
212
-
213
-
214
-
215
-
216
-
217
-
218
-
219
-
220
-
221
-
222
-
223
-
224
 |
 |
