Beko CEP5152 Owners Manual - Page 13
Manual Espresso Machine / User Manual
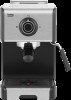 |
View all Beko CEP5152 manuals
Add to My Manuals
Save this manual to your list of manuals |
Page 13 highlights
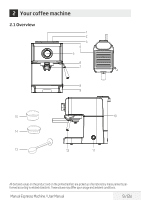
4 Operation and use 4.3.3 Warming Internal Components & Cups Before making espresso, it is important to prewarm all the internal components in the appliance and the cups. This short procedure will add 10° to 15° F to the first cup of espresso. 1. Fill the water tank (3) with fresh cold water as described in chapter. 2. Make sure the Control Knob (5) is in the " " position. 3. Turn on the machine by pressing the Power Button (11) located on the side of the machine. The indicator light on the Control Knob (5) begins to blink red as the machine begins to heat. 4. Place the sieve inside the portafilter (7) (without coffee) 3 for proper sieve placement. 5. Make sure the thumb guard does not cover the sieve. 6. Align the portafilter (7) to the "INSERT" on the left side of the brew head (6), while pushing the portafilter up. Turn the portafilter firmly to the right towards the "LOCK" on the middle of the brew head, until it feels tight. CAUTION: Never leave the ma- A chine unattended during brewing or steaming. You always must turn the Control Knob (5) back to the center position towards the " " position to stop brewing. 10.Empty the cups and remove the portafilter (7). All parts are now pre-warmed. TIP! Place espresso cups upside down on the warming platform (4) on top of the machine. When the machine has been turned on for approximately 15 minutes, the warming platform will be heated and can be used to prewarm cups instead of using hot water from the machine. In the beginning it might not be possible to turn the portafilter all the way to the "LOCK" position. Just make sure the portafilter is firmly placed. Over time the portafilter can be moved closer to the "LOCK" position. 7. Place one or two espresso cups underneath the portafilter. Once the indicator light illuminates solid blue, the machine is ready for coffee brewing. 8. Turn the Control Knob (5) to the left towards the "Cup icon". Hot water will be pumped through the portafilter (7) into the cups. 9. Turn the Control Knob (5) back to the center towards the " " to stop the flow of hot water. Manual Espresso Machine / User Manual 13 / EN
-
 1
1 -
2
-
3
-
4
-
5
-
6
-
7
-
 8
8 -
 9
9 -
 10
10 -
 11
11 -
 12
12 -
 13
13 -
 14
14 -
 15
15 -
 16
16 -
 17
17 -
 18
18 -
19
-
20
-
21
-
22
-
23
-
24
-
25
-
26
-
27
-
28
-
29
-
30
-
31
-
32
-
33
-
34
-
35
-
36
-
37
-
38
-
39
-
40
-
41
-
42
-
43
-
44
-
45
-
46
-
47
-
48
-
49
-
50
-
51
-
52
-
53
-
54
-
55
-
56
-
57
-
58
-
59
-
60
-
61
-
62
-
63
-
64
-
65
-
66
-
67
-
68
-
69
-
70
-
71
-
72
-
73
-
74
-
75
-
76
-
77
-
78
-
79
-
80
-
81
-
82
-
83
-
84
-
85
-
86
-
87
-
88
-
89
-
90
-
91
-
92
-
93
-
94
-
95
-
96
-
97
-
98
-
99
-
100
-
101
-
102
-
103
-
104
-
105
-
106
-
107
-
108
-
109
-
110
-
111
-
112
-
113
-
114
-
115
-
116
-
117
-
118
-
119
-
120
-
121
-
122
-
123
-
124
-
125
-
126
-
127
-
128
-
129
-
130
-
131
-
132
-
133
-
134
-
135
-
136
-
137
-
138
-
139
-
140
-
141
-
142
-
143
-
144
-
145
-
146
-
147
-
148
-
149
-
150
-
151
-
152
-
153
-
154
-
155
-
156
-
157
-
158
-
159
-
160
-
161
-
162
-
163
-
164
-
165
-
166
-
167
-
168
-
169
-
170
-
171
-
172
-
173
-
174
-
175
-
176
-
177
-
178
-
179
-
180
-
181
-
182
-
183
-
184
-
185
-
186
-
187
-
188
-
189
-
190
-
191
-
192
-
193
-
194
-
195
-
196
-
197
-
198
-
199
-
200
-
201
-
202
-
203
-
204
-
205
-
206
-
207
-
208
-
209
-
210
-
211
-
212
-
213
-
214
-
215
-
216
-
217
-
218
-
219
-
220
-
221
-
222
-
223
-
224
 |
 |
