Belkin F5D7000_V5 User Manual - Page 40
IP Address, Subnet Mask, Connection ID optional, Disconnect after X, Setting Custom Domain Name
 |
View all Belkin F5D7000_V5 manuals
Add to My Manuals
Save this manual to your list of manuals |
Page 40 highlights
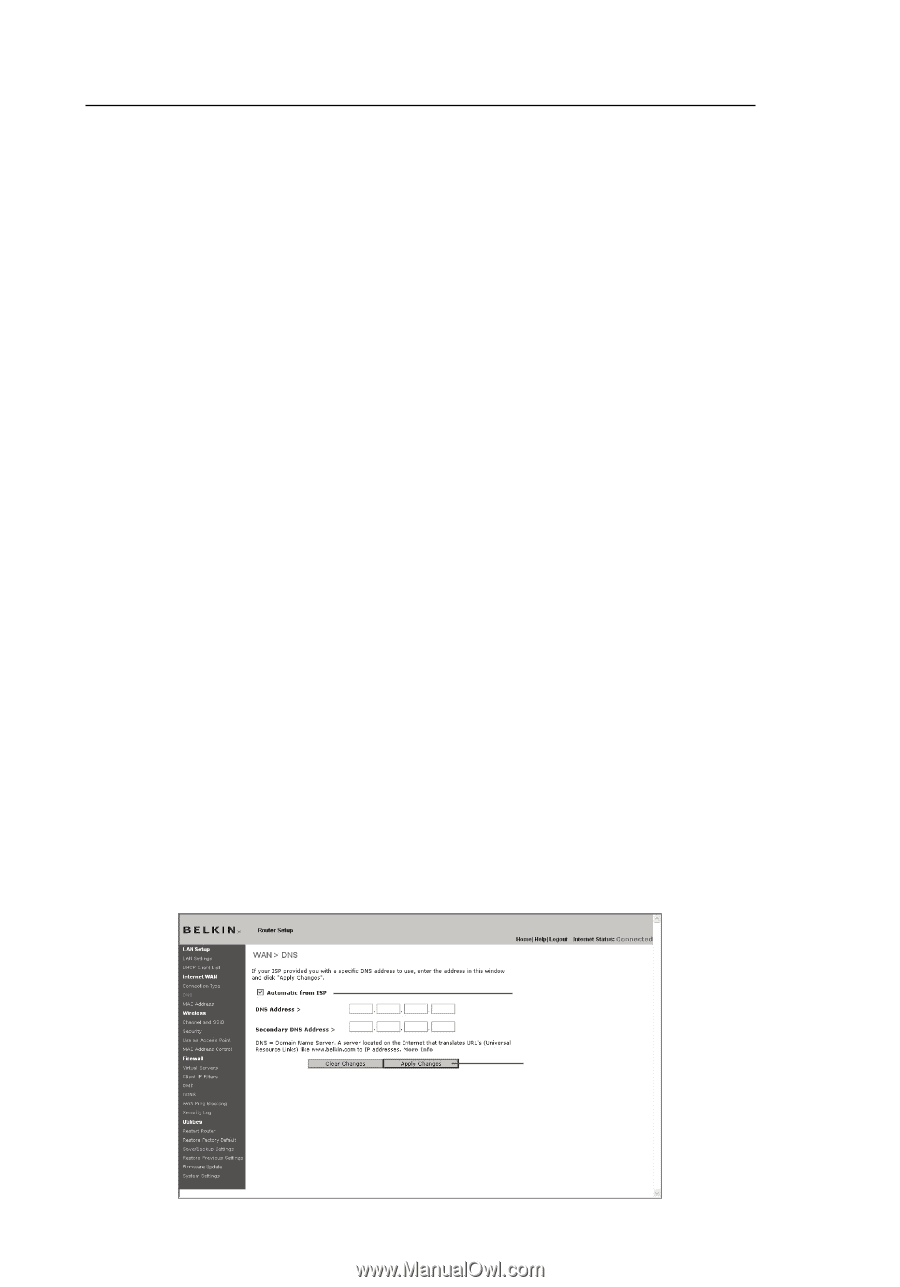
Alternate Setup Method 5. IP Address Enter the IP address that your ISP has assigned to you. 6. Subnet Mask Enter the subnet mask that your ISP has assigned to you. 7. Connection ID (optional) Provided by your ISP. If your ISP did not give you a connection ID, leave this blank. 8. Disconnect after X.... The "Disconnect" feature is used to automatically disconnect the Router from your ISP when there is no activity for a specified period of time. For instance, placing a check mark next to this option and entering "5" into the minute field will cause the Router to disconnect from the Internet after five minutes of no Internet activity. This option should be used if you pay for your Internet service by the minute. Setting Custom Domain Name Server (DNS) Settings A "Domain Name Server" is a server located on the Internet that translates Universal Resource Locaters (URLs) like "www.belkin.com" to IP addresses. Many Internet Service Providers (ISPs) do not require you to enter this information into the Router. The "Automatic from ISP" box (1) should be checked if your ISP did not give you a specific DNS address. If you are using a static IP connection type, then you may need to enter a specific DNS address and secondary DNS address for your connection to work properly. If your connection type is dynamic or PPPoE, it is likely that you do not have to enter a DNS address. Leave the "Automatic from ISP" box checked. To enter the DNS address settings, uncheck the "Automatic from ISP" box and enter your DNS entries in the spaces provided. Click "Apply Changes" (2) to save the settings. (1) (2) 36
-
 1
1 -
2
-
3
-
4
-
5
-
6
-
7
-
8
-
9
-
10
-
11
-
12
-
13
-
14
-
15
-
16
-
17
-
18
-
19
-
20
-
21
-
22
-
23
-
24
-
25
-
26
-
27
-
28
-
29
-
30
-
31
-
32
-
33
-
34
-
 35
35 -
 36
36 -
 37
37 -
 38
38 -
 39
39 -
 40
40 -
 41
41 -
 42
42 -
 43
43 -
 44
44 -
 45
45 -
46
-
47
-
48
-
49
-
50
-
51
-
52
-
53
-
54
-
55
-
56
-
57
-
58
-
59
-
60
-
61
-
62
-
63
-
64
-
65
-
66
-
67
-
68
-
69
-
70
-
71
-
72
-
73
-
74
-
75
-
76
-
77
-
78
-
79
-
80
-
81
-
82
-
83
-
84
-
85
-
86
-
87
-
88
-
89
-
90
-
91
-
92
-
93
-
94
-
95
-
96
-
97
-
98
-
99
-
100
-
101
-
102
-
103
-
104
-
105
-
106
 |
 |