Belkin F5D9010 User Manual - Page 12
Step 3, Install the Wireless Client Utility - driver for
 |
View all Belkin F5D9010 manuals
Add to My Manuals
Save this manual to your list of manuals |
Page 12 highlights
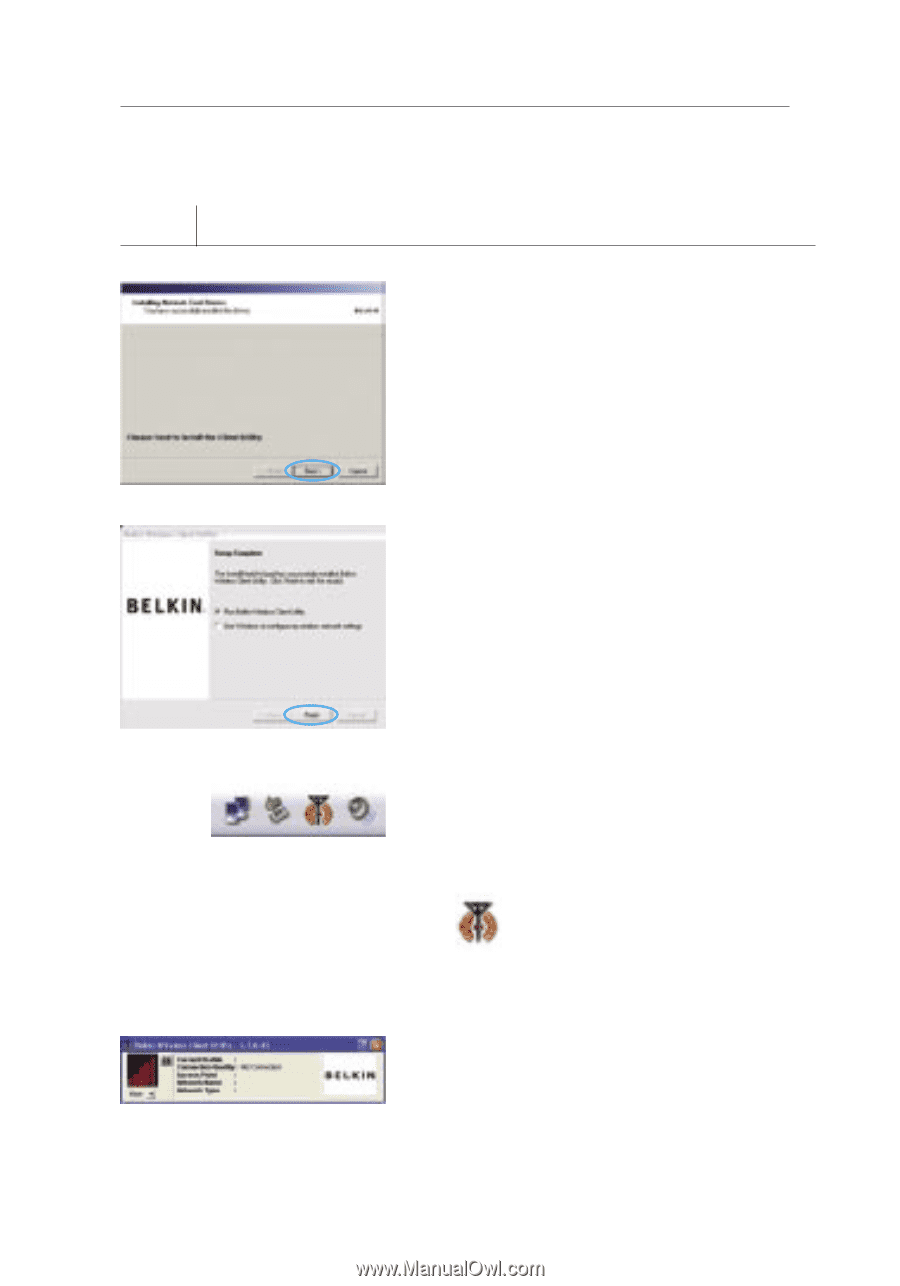
Installing and Setting Up the Card Step 3 Install the Wireless Client Utility 3.1 After the network card driver installation is complete, click "Next" to install the Wireless Client Utility. 3.2 The wizard will prompt you to choose an installation location. Click "Next" to accept the default location, or click "Browse" to select a different location before clicking "Next". 3.3 Click "Finish" to start the Belkin Wireless Client Utility. 3.4 A small Signal Indicator icon should appear in your system tray (bottom right corner of most screens). Double-click on this to bring up the Wireless Client Utility. 3.5 The compact Wireless Client Utility screen will appear. Click on "More" to open up the expanded view. 10
-
 1
1 -
2
-
3
-
4
-
5
-
6
-
 7
7 -
 8
8 -
 9
9 -
 10
10 -
 11
11 -
 12
12 -
 13
13 -
 14
14 -
 15
15 -
 16
16 -
 17
17 -
18
-
19
-
20
-
21
-
22
-
23
-
24
-
25
-
26
-
27
-
28
-
29
-
30
-
31
-
32
-
33
-
34
-
35
-
36
-
37
-
38
-
39
-
40
-
41
-
42
-
43
-
44
-
45
 |
 |
10
Installing and Setting Up the Card
Step 3
Install the Wireless Client Utility
3.1
After the network card driver
installation is complete, click “Next”
to install the Wireless Client Utility.
3.2
The wizard will prompt you to choose
an installation location. Click “Next”
to accept the default location, or click
“Browse” to select a different location
before clicking “Next”.
3.3
Click “Finish” to start the Belkin
Wireless Client Utility.
3.4
A small Signal Indicator icon should
appear in your system tray (bottom
right corner of most screens).
Double-click on this to bring up the
Wireless Client Utility.
3.5
The compact Wireless Client Utility
screen will appear. Click on “More”
to open up the expanded view.