Beltronics RX75 Owner's Manual - Page 6
Controls and Features, How to customize the RX75 with Programming
 |
UPC - 065789230758
View all Beltronics RX75 manuals
Add to My Manuals
Save this manual to your list of manuals |
Page 6 highlights
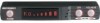
Controls and Features KA1 X1 X 10.525 Here Threat Display™ shows 1 weak Display shows an X-band signal at Ka-band signal, and a weak X-band 10.525 GHz signal. X Note: Even long-time detector users will require a significant amount of time to On very weak signals, there will not get familiar with this new level of be a number at all. This shows a very information. weak X-band signal. Optional Laser Pro 904 Threat Display™ Details Laser Pro 904 Configuration The band designators (X, K, Ka) will Your Bel Pro Remote is fully compatible stay on the display for a few seconds after with Bel's Laser Pro 904. Once added, the the signal has passed. This allows you to see integrated Laser Blocker's add a new level of what the unit detected, even on very brief laser defense to your RX75 remote, making signals. it the ultimate defense against laser guns. However, the numbers representing Once the Laser Blocker's have been the signal strength continuously change connected to RX75's Interface, the internal (several times a second) to give you a computer will automatically make changes continuous view of the signal strength of all to the "Bands" programming options. Under radar signals present. the "Laser" option, the Laser Blocker's can TechDisplay now be programmed to receive only, or "Block" (default once connected), an The RX75's new TechDisplay option is also incoming laser signal. Also, during the start- designed for the advanced detector user. In up sequence, the RX75 will acknowledge this mode, the RX75 will display the actual the new configuration. numeric radar frequency being received. During a laser alert, the display will K 24.150 show "Front" "Lsr Blck" when a signal is received from the front, or "Rear" "Lsr Blck" Display shows a K-band signal at when a signal is received from the rear. This 24.150 GHz message will be accompanied by the normal Ka34.700 Laser alert tone. For more information on the Laser Pro Display shows a Ka-band signal at 904, consult your 12-volt retailer. 34.700 GHz 8 How to customize the RX75 with Programming There are 8 user-selectable options so you can customize your RX75 for your own preferences. The buttons that are normally used for CITY and VOL/MUTE are used to enter the Program Mode, to REVIEW your current program settings, and to CHANGE any settings as desired. Pages 11-13 explain each option in more detail. How to use Programming 1 To enter Program Mode, press both buttons and hold for 2 seconds. RX75 will beep twice and display "Program." (Brightness is at maximum during programming.) 2 Then press the REV button to REVIEW the current settings. (You can either tap the button to change from item to item, or hold the button to scroll through the items.) 3 Press the CHG button to CHANGE any setting. (You can either tap the button to change from setting to setting, or hold the button to scroll through all the options). An example Here's how you would turn RX75's AutoMute feature off. 1 Enter the Program Mode by holding both buttons down for 2 seconds. RX75 will beep twice and display Program. 2 Press and hold the REV button. The RX75 will scroll through the categories, starting with Pilot Light Pilot, then Power-on sequence PwrOn , then Signal strength meter Meter, then AutoMute aMute. 3 Release the REV button when the RX75 shows the AutoMute item. Since the factory setting is for AutoMute to be on, the RX75 will display aMute ON. (If you accidentally don't release the REV button in time, and RX75 goes to the next category, hold the REV button down again, and after RX75 scrolls through all categories, it will begin again at the top of the list.) 4 To leave the Program Mode, simply wait 8 seconds without pressing any button. (The unit will display "Complete," beep 4 times, and return to normal operation.) (To quickly return to all of the factory defaults, press and hold the CITY and VOL/MUTE buttons while turning on the unit.) 4 Press the CHANGE button to change from aMute ON to aMute OFF. 5 To complete the Programming, simply wait 8 seconds without pressing any button. The RX75 will display Complete, beep 4 times, and return to normal operation. 9
-
 1
1 -
 2
2 -
 3
3 -
 4
4 -
 5
5 -
 6
6 -
 7
7 -
 8
8 -
 9
9 -
 10
10 -
 11
11 -
 12
12 -
13
-
14
 |
 |
