BenQ DV3250 User Manual - Page 35
Picture Menu
 |
View all BenQ DV3250 manuals
Add to My Manuals
Save this manual to your list of manuals |
Page 35 highlights
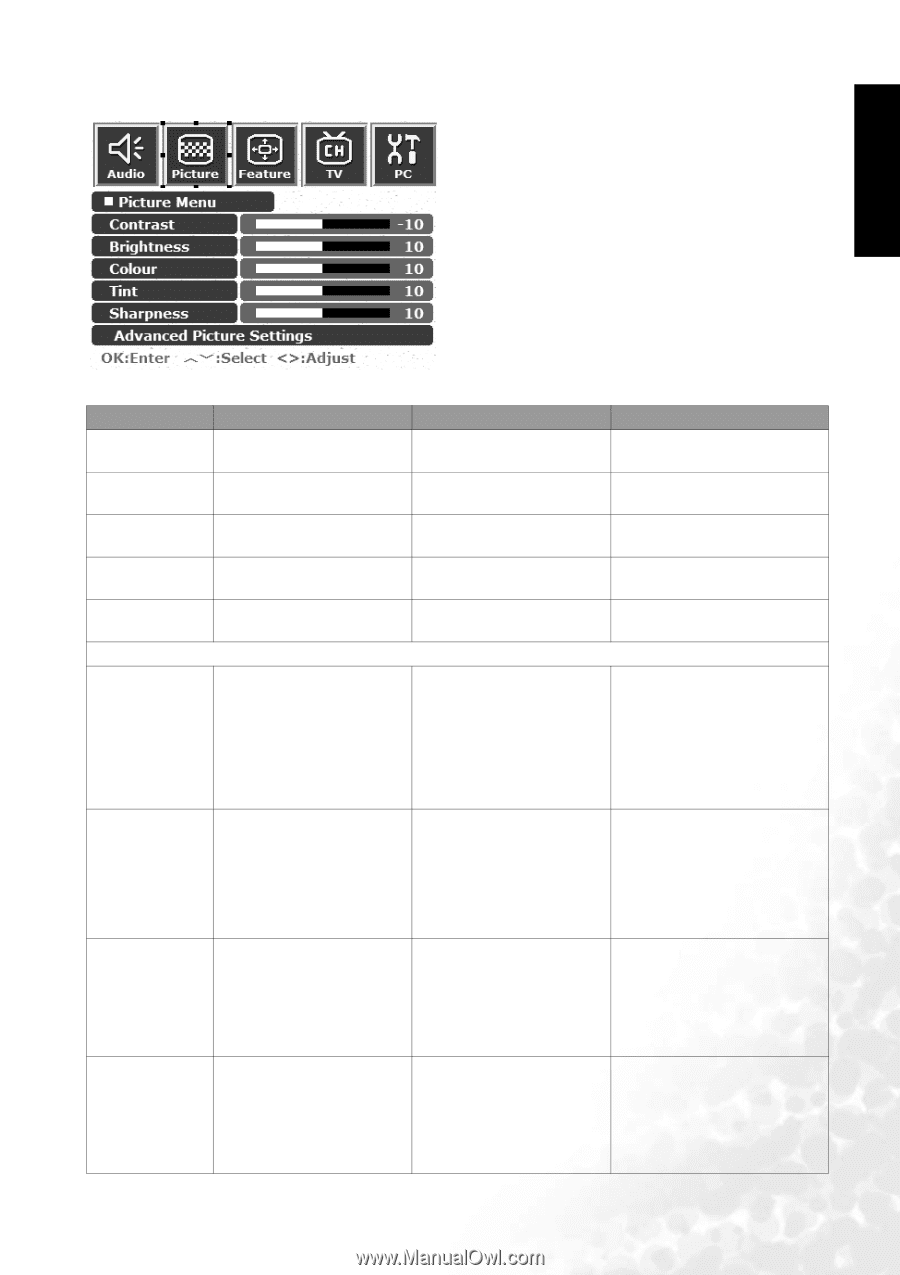
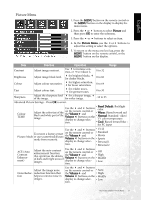
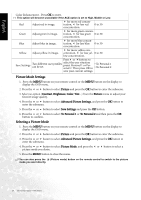
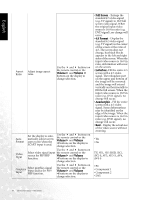
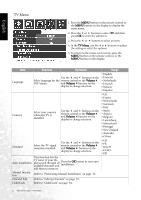
English Picture Menu 1. Press the MENU button on the remote control or the MENU button on the display to display the main menu. 2. Press the or buttons to select Picture and then press OK to enter the submenu. 3. Press the or buttons to select an item. 4. In the Picture Menu, use the or buttons to adjust the setting or select the options. 5. To return to the menu one level up, press the MENU button on the remote control, or the MENU button on the display. Item Function Operation Range Contrast Adjust image contrast. Use to increase contrast, or to reduce it. 0 to 32 Brightness Colour Adjust image black level. Adjust colour saturation. for brighter blacks, for darker blacks. for higher saturation, for lower saturation. 0 to 60 0 to 64 Tint Adjust colour tint. for redder tones, for greener tones. 0 to 30 Sharpness Adjust the sharpness level for a sharper image, of the image. for softer image. Advanced Picture Settings - Press OK to enter. -14 to 25 Colour TEMP. Adjust the color tint of the black and white part of the image. Use the and buttons on the remote control or the Volume and Volume buttons on the display to change selec- • Panel Default: Backlight color • Warm: Biased toward red • Normal: Standard video/ TV color temperature tion. • Cool: Biased toward blue - for PC input Use the and buttons • Vivid To restore a factory preset Picture Mode or user customized picture mode from memory. on the remote control or the Volume and Volume buttons on the display to change selec- • Standard • Movie • Sports • Personal 1 tion. • Personal 2 ACE (Auto Contrast Enhancement) Adjust the auto contrast enhancement function that optimizes the density of dark and bright areas of images. Use the and buttons on the remote control or the Volume and Volume buttons on the display to change selection. • Off • High • Middle • Low Adjust the image noise Noise Reduc- reduction function that tion helps to remove noise in images. Use the and buttons on the remote control or • Auto the Volume and • High Volume buttons on the • Middle display to change selec- • Low tion. On-Screen Display (OSD) Menu 27
-
 1
1 -
2
-
3
-
4
-
5
-
6
-
7
-
8
-
9
-
10
-
11
-
12
-
13
-
14
-
15
-
16
-
17
-
18
-
19
-
20
-
21
-
22
-
23
-
24
-
25
-
26
-
27
-
28
-
29
-
 30
30 -
 31
31 -
 32
32 -
 33
33 -
 34
34 -
 35
35 -
 36
36 -
 37
37 -
 38
38 -
 39
39 -
 40
40 -
41
-
42
-
43
-
44
-
45
-
46
-
47
-
48
-
49
-
50
 |
 |