BenQ FP71W User's Manual
BenQ FP71W Manual
 |
View all BenQ FP71W manuals
Add to My Manuals
Save this manual to your list of manuals |
BenQ FP71W manual content summary:
- BenQ FP71W | User's Manual - Page 1
FP71W LCD Color Monitor 17.0" LCD Panel Size User's Manual Welcome - BenQ FP71W | User's Manual - Page 2
manual or otherwise, without the prior written permission of BenQ Corporation. ii Disclaimer BenQ BenQ Corporation to notify any person of such revision or changes. iii Please follow these safety instructions for best performance, and long life for your monitor Servicing • Do not attempt to service - BenQ FP71W | User's Manual - Page 3
the Windows Upgrade Device Driver Wizard 18 How to adjust the screen resolution 20 How to adjust the screen refresh rate 21 How to set the picture optimization 22 How to adjust your Monitor 23 A Look at the Control Panel 23 Hot Key Mode ...24 Troubleshooting ...33 Frequently Asked Questions - BenQ FP71W | User's Manual - Page 4
4 Table of Contents - BenQ FP71W | User's Manual - Page 5
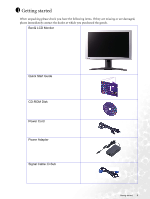
1 Getting started When unpacking please check you have the following items. If they are missing or are damaged, please immediately contact the dealer at which you purchased the goods. BenQ LCD Monitor Quick Start Guide CD-ROM Disk Power Cord Power Adapter Signal Cable: D-Sub Getting started 5 - BenQ FP71W | User's Manual - Page 6
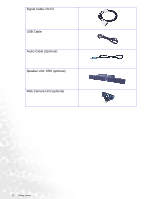
Signal Cable: DVI-D USB Cable Audio Cable (Optional) Speaker Unit: SRS (optional) Web Camera Unit (optional) 6 Getting started - BenQ FP71W | User's Manual - Page 7
2 Getting to know your Monitor Front View Back View (1) Getting to know your Monitor 7 - BenQ FP71W | User's Manual - Page 8
Input 5. DVI-D Connector 6. D-Sub Connector 7. USB Connectors 1. "Power" 2. "Enter" key 3. t (Up) key 4. u (Down) key 5. "Exit" key 6. "Mode" key 7. "Input" key 8. "iKey" 8 Getting to know your Monitor - BenQ FP71W | User's Manual - Page 9
hardware Make sure that the computer and monitor's power are both turned off. Please go along with the following steps to install your LCD monitor. 1. Unpack the monitor and place it on a stable surface. 2. Press the locking tab of the cable cover (as shown) to release the cover. 3. Connect the - BenQ FP71W | User's Manual - Page 10
the other end of the signal cable to your computer as shown. 5. Connect the USB cable from your monitor (as shown) to your computer. 6. Connect the power adaptor plug to your monitor as shown. To disconnect the power, always pull from the plug, not the cord. 10 How to install your monitor hardware - BenQ FP71W | User's Manual - Page 11
the Power Cord to the power adaptor then plug the other end into a nearby wall socket. (Use only power supplies listed in the user's manual) 9. Press the Power button on the side panel of the monitor. The power indicator will light up. Note: The USB port on the top panel of your - BenQ FP71W | User's Manual - Page 12
Adjusting the viewing angle Your LCD monitor is designed with a tilt feature that allows you to achieve your optimal viewing angle. 12 How to install your monitor hardware - BenQ FP71W | User's Manual - Page 13
for connection to your digital camera, digital video camera, USB reader, USB printer, USB memory stick, or any other USB device. What do I have to do? All you have to do, is connect the monitor cables as instructed in How to install your monitor hardware of this User's Manual, turn the computer and - BenQ FP71W | User's Manual - Page 14
selecting and installing the BenQ LCD Monitor driver software on a new computer which has never had a monitor driver installed before. This instruction is only suitable for a computer which has never been used before, and for which the BenQ LCD Monitor is the first ever monitor to be connected to - BenQ FP71W | User's Manual - Page 15
instruction details the procedure for manually updating the existing monitor driver software on your Microsoft Windows computer. It is currrently tested as compatible (and recommended only) for Windows 98, Windows ME, Windows 2000, and Windows XP Operating System (OS). The BenQ LCD Monitor driver - BenQ FP71W | User's Manual - Page 16
Start | Control Panel | Appearance and Themes | Change the screen resolution. The Display Properties window will display. 2. Click the Settings found and selected the BenQ driver on the CD appropriate to your monitor model, in this case 'BenQ FP71W' in the location 'd:\driver\FP71W.inf ' or similar - BenQ FP71W | User's Manual - Page 17
case, see the instructions at How to Driver Wizard, skipping the next step. 4. In Windows 2000, click the Driver tab and the Update Driver button. The Upgrade Device Driver Wizard will display. See How to complete the Windows Upgrade Device Driver Wizard. Getting the most from your BenQ monitor - BenQ FP71W | User's Manual - Page 18
". 8. Click the OK button. This will return you to the Upgrade Device Driver Wizard. 9. Select (single-click) the file named BenQ FP71W, and click the Next button. 10. Click Next. This will copy the appropriate monitor driver files to your computer. 11. Click Finish. On Windows 2000, this will close - BenQ FP71W | User's Manual - Page 19
will close the Display Properties window, and if you made any changes to the screen resolution, Windows 2000 will prompt you for confirmation to effect the changes, and further confirmation to causes Windows to load the new drivers when it next restarts. Getting the most from your BenQ monitor 19 - BenQ FP71W | User's Manual - Page 20
is always fixed. The best possible picture for your FP71W is achieved with a resolution of 1280x768. This is called "Native Resolution" or maximal resolution - that is, the clearest picture. Lower resolutions are displayed on a full screen through an interpolation circuit. However flaws do - BenQ FP71W | User's Manual - Page 21
in your computer. There is a table with the factory modes in the specification section of this User's Manual. You can choose 60, 70 and 75 Hertz, (but not 72Hz) for the native resolution of 1280x768. 1. Double click the Display icon in Control Panel. 2. From the Display Properties window, select the - BenQ FP71W | User's Manual - Page 22
adjust the screen settings manually using the buttons on the monitor panel. To assist you in this endeavour, BenQ has provided a screen test keys to adjust the monitor until the noise disappears. To make sure the i key function performs well, you have to select one of the supported modes. If the - BenQ FP71W | User's Manual - Page 23
8 How to adjust your Monitor A Look at the Control Panel There are 8 keys for user's control including "Enter", "t" , "u", "Exit" , "Mode" , "Input" , Switch the input signal. 8. "iKey" : Adjust vertical position, phase, horizontal position and pixel clock automatically. How to adjust your Monitor 23 - BenQ FP71W | User's Manual - Page 24
newly defined settings will be activated spontaneously. When the adjustment is done, the Mode menu will disappear in 2 to 3 seconds. 24 How to adjust your Monitor - BenQ FP71W | User's Manual - Page 25
to the previous menu. Press t or u key to adjust the degree of Contrast, press "Exit" to return to the previous menu. How to adjust your Monitor 25 - BenQ FP71W | User's Manual - Page 26
return to previous menu. Press t or u key to adjust the degree of Phase, press "Exit" to return to previous menu. 26 How to adjust your Monitor - BenQ FP71W | User's Manual - Page 27
Color sub menu User Preset: User may set the color balance of Red, Green and Blue. How to adjust your Monitor 27 - BenQ FP71W | User's Manual - Page 28
previous menu. Press t or u key to adjust the display time of the OSD, press "Exit" to return to previous menu. 28 How to adjust your Monitor - BenQ FP71W | User's Manual - Page 29
Language sub menu How to adjust your Monitor 29 - BenQ FP71W | User's Manual - Page 30
you choose "Yes", it will recall all the current settings to default settings. Press "Exit" will return to previous menu. 30 How to adjust your Monitor - BenQ FP71W | User's Manual - Page 31
of Standard mode, while the right window presents the images under the specified mode. To return to previous menu, press "Exit." How to adjust your Monitor 31 - BenQ FP71W | User's Manual - Page 32
Input Select: Select D-sub (analog), DVI (digital), S-Video, or Composite input to activate the new settings. Sharpness: Press t or u key to adjust the degree of Sharpness and activate the new settings. Display Information. 32 How to adjust your Monitor - BenQ FP71W | User's Manual - Page 33
9 Troubleshooting Frequently Asked Questions (FAQ) The image is blurred: Read the How to adjust the screen resolution section, and then select the correct resolution, refresh rate and make adjustments based on these instructions. How do you use a VGA extension cable? Remove the extension cable for - BenQ FP71W | User's Manual - Page 34
adjust the screen resolution section and then select the correct resolution, refresh rate and make adjustments based on these instructions. Need More Help? If your problems remain after checking this manual, please contact your place of purchase or e-mail us at: [email protected] 34 Troubleshooting - BenQ FP71W | User's Manual - Page 35
10 Supported operating modes Incoming display mode (Input timing) Resolution Horizontal Frequency (KHz) altering an automatic setting or by manually changing the phase setting and the pixel frequency from the "Geometry" menu. • If you switch off the monitor, interference lines can occur on your - BenQ FP71W | User's Manual - Page 36
DC input voltage DC input current Power saving mode FP71W 17.0" , active, TFT 43.2 cm 1280 x 768 16.2 million 800:1 / 450 cd/m2 25 ms 170/170, 170/170 (CR=10) 30 - 83 kHz Multi- frequency monitor 50 - 76 Hz modes within these parameters Digital, Screen OSD Technology, iKey (automatic image setting - BenQ FP71W | User's Manual - Page 37
Synchronisation Temperature (operating) Air humidity (operating) Certifications Operating voltage Dimensions (W x H x D) Weight RGB analog 0.7 Vpp/75 Ohm positive Digital: DVI-D S-Video Composite TTL separate signal connection 15-pin mini D-sub cable 0 °C - 40 °C 10% - 90% TCO 99, TÜV/Ergonomics
-
 1
1 -
 2
2 -
 3
3 -
 4
4 -
 5
5 -
 6
6 -
 7
7 -
8
-
9
-
10
-
11
-
12
-
13
-
14
-
15
-
16
-
17
-
18
-
19
-
20
-
21
-
22
-
23
-
24
-
25
-
26
-
27
-
28
-
29
-
30
-
31
-
32
-
33
-
34
-
35
-
36
-
37
 |
 |

FP71W
LCD Color Monitor
17.0" LCD Panel Size
User’s Manual
Welcome