BenQ TK850 User Manual - Page 19
Using the menus, Upgrading firmware, Securing the projector, Using a security cable lock
 |
View all BenQ TK850 manuals
Add to My Manuals
Save this manual to your list of manuals |
Page 19 highlights
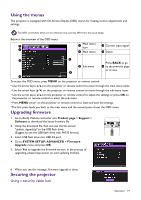
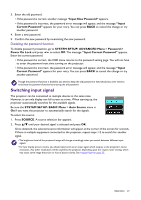
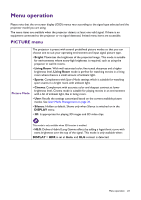
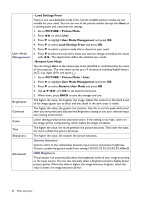
Using the menus The projector is equipped with On-Screen Display (OSD) menus for making various adjustments and settings. The OSD screenshots below are for reference only, and may differ from the actual design. Below is the overview of the OSD menu. 1 2 Main menu 1 icon 2 Main menu 4 Current input signal 5 Status 3 5 Press BACK to go 3 Sub-menu 6 to the previous page or to exit. 6 4 To access the OSD menu, press MENU on the projector or remote control. • Use the arrow keys ( / ) on the projector or remote control to move through the main menu items. • Use the arrow keys ( / ) on the projector or remote control to move through the sub-menu items. • Use the arrow keys ( / ) on the projector or remote control to adjust the settings or press OK on the projector or remote control to enter the sub-menu. • Press MENU twice* on the projector or remote control to leave and save the settings. *The first press leads you back to the main menu and the second press closes the OSD menu. Upgrading firmware 1. Go to BenQ Website and enter into Product page > Support > Software to download the latest firmware file. 2. Unzip the download file, find and save the file named "update_signed.zip" to the USB flash drive. (Suggest to use the USB flash drive with FAT32 format) 3. Insert USB flash drive into USB 3.0 port. 4. Go to SYSTEM SETUP: ADVANCED > Firmware Upgrade menu and press OK. 5. Select Yes to upgrade the firmware version. In the process of upgrading, please keep power on until updating finished. 6. When you see this message, firmware upgrade is done. Securing the projector Using a security cable lock Operation 19
-
 1
1 -
2
-
3
-
4
-
5
-
6
-
7
-
8
-
9
-
10
-
11
-
12
-
13
-
 14
14 -
 15
15 -
 16
16 -
 17
17 -
 18
18 -
 19
19 -
 20
20 -
 21
21 -
 22
22 -
 23
23 -
 24
24 -
25
-
26
-
27
-
28
-
29
-
30
-
31
-
32
-
33
-
34
-
35
-
36
-
37
-
38
-
39
-
40
-
41
-
42
 |
 |
