Beretta BU9 Nano Beretta BU Nano User Manual - Page 34
Replacing The Magazine, Release Button
 |
View all Beretta BU9 Nano manuals
Add to My Manuals
Save this manual to your list of manuals |
Page 34 highlights
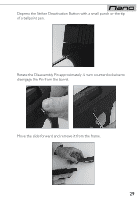
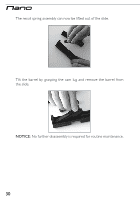
REPLACING THE MAGAZINE RELEASE BUTTON WARNING: Make sure the pistol is unloaded. If not, unload it following the "UNLOADING" procedure (pages 15-17). CAUTION: Before proceeding with the disassembly of the parts, closely observe and memorize the position of the components to make assembly easier. NOTICE: It is advisable to perform field stripping and assembly operations over a table to catch components should they drop. Remove the magazine. Insert a properly sized drift-punch into the hole of the magazine release button mounted on the pistol. Without using excessive force, firmly push, the drift-punch into the hole. This will allow the magazine release button to disengage from the internal pin, which will protrude from the opposite side. 34
-
 1
1 -
2
-
3
-
4
-
5
-
6
-
7
-
8
-
9
-
10
-
11
-
12
-
13
-
14
-
15
-
16
-
17
-
18
-
19
-
20
-
21
-
22
-
23
-
24
-
25
-
26
-
27
-
28
-
 29
29 -
 30
30 -
 31
31 -
 32
32 -
 33
33 -
 34
34 -
 35
35 -
 36
36 -
 37
37 -
 38
38 -
 39
39 -
40
-
41
-
42
-
43
-
44
-
45
-
46
-
47
-
48
-
49
-
50
-
51
-
52
-
53
-
54
-
55
-
56
 |
 |

34
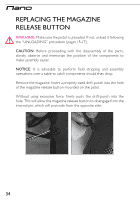
REPLACING THE MAGAZINE
RELEASE BUTTON
WARNING
:
Make sure the pistol is unloaded. If not, unload it following
the “UNLOADING” procedure (pages 15-17).
CAUTION:
Before proceeding with the disassembly of the parts,
closely observe and memorize the position of the components to
make assembly easier.
NOTICE:
It is advisable to perform field stripping and assembly
operations over a table to catch components should they drop.
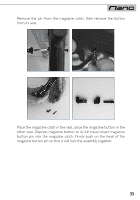
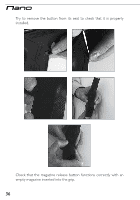
Remove the magazine. Insert a properly sized drift-punch into the hole
of the magazine release button mounted on the pistol.
Without using excessive force, firmly push, the drift-punch into the
hole. This will allow the magazine release button to disengage from the
internal pin, which will protrude from the opposite side.