Bernina 125 Manual - Page 10
replace, Bobbin, Shuttle, Needle, thread, Machine, Threading
 |
View all Bernina 125 manuals
Add to My Manuals
Save this manual to your list of manuals |
Page 10 highlights
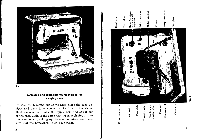
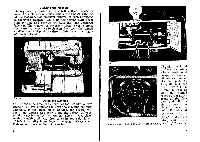
To replace the Bobbin Case in the Shuttle The bobbin case can be inserted only when the needle is at its highest point. As when removing the bobbin case (Fig. 8), hold it by the hinged latch 7 between the forefinger and thumb of the left hand in such a way that the horn 19 (Fig. 10) is directed upwards and enters in the cutting of the shuttle race cover 52 (Fig. 5). Then push the bobbin case on the shuttle pin as far as it will go. Let the latch drop back into position and make sure that it is properly closed. If the hinged latch does not close well, remnants of thread must have collected at the base of the shuttle pin. To set the Needle Use system 705 needles only for the portable machine model 125. Bent needles or those with blunt points should not be used. Turn the handwheel towards you until the needle bar is at its highest point. Now hold the needle between thumb and forefinger of the left hand in such a way that the long groove is facing the seamstress. The fiat side of the needle shank is therefore at the rear. Loosen the needle clamp screw by turning it anticlockwise, insert the needle and push it upwards as far as it will ga. Then tighten the needle clamp screw by turning it clockwise. It is important to make sure that the needle is pushed right up and is firmly held by the needle clamp screw. To thread the Machine The correct method of threading is clearly shown in Fig. 11. From the spool, that is placed on the pin 9 at the back of the arm, the thread is lead through the guides 11 and 20, then down to the right of and between the tension discs closed into the box 21, up in the thread control spring 22, down under the guide 23, up to and through the eyelet 24, then through the loop of the take-up lever 25, again down through the eyelet 24, behind the pin 26, through the needle holder eyelet 27 down to the eye of the needle, which is to be threaded from front to back. 16 ERNI A Fig. 11 Threading the Machine 17
-
 1
1 -
2
-
3
-
4
-
 5
5 -
 6
6 -
 7
7 -
 8
8 -
 9
9 -
 10
10 -
 11
11 -
 12
12 -
 13
13 -
 14
14 -
 15
15 -
16
-
17
-
18
-
19
-
20
-
21
-
22
-
23
-
24
-
25
-
26
-
27
-
28
-
29
-
30
 |
 |
