Bernina 125 Manual - Page 17
Edger, Outlier, Guide, Zigzag, Sewing
 |
View all Bernina 125 manuals
Add to My Manuals
Save this manual to your list of manuals |
Page 17 highlights
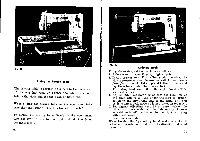
BERNINA S Fig. 21 The Edger with Outlier Guide As the illustration shows, the stitch hole is located right at the edge of the presser foot. This presser foot without guide is therefore particularly suitable for sewing directly along the edge of the fabric. If the edger is fitted with the quilter guide, it will be found ideal for quilting work, as the above illustration shows. First fix the quilter guide with the blade at the desired distance from the edger. Then make a seam and shift the material to the right, until the seam just made will be exactly below the blade of the quilter guide. Now run a further seam, following with the blade of the quilter guide the first one, and so on. When all the seams are made in one direction, repeat the operation in the transverse direction, i. e. at right angles to the first rows of seams. 30 Fig. 22 Zigzag Sewing (Use only 2 or 2 ply cotton, never 6 ply) For zigzag sewing set the machine as follows: 1. Bring take-up lever 25 to its highest point. 2. Insert zigzag presser foot (Fig. 28). Make sure not to use the zigzag embroidery foot, marked with one red stripe (Fig. 29). Its bottom side is hollow ground, while the zigzag foot is plain. Take top and bottom threads and lay them back under the presser foot. 3. Turn drop feed knob 28 to the right, until sewing sign will appear. 31
-
 1
1 -
2
-
3
-
4
-
5
-
6
-
7
-
8
-
9
-
10
-
11
-
 12
12 -
 13
13 -
 14
14 -
 15
15 -
 16
16 -
 17
17 -
 18
18 -
 19
19 -
 20
20 -
 21
21 -
 22
22 -
23
-
24
-
25
-
26
-
27
-
28
-
29
-
30
 |
 |
